Why Craftsman Porch Posts Come Loose at the Base
Old porch repairs have gotten complicated with all the “tear it out and start over” advice flying around. I watched my 1927 Craftsman bungalow’s front porch column develop a wobble for three solid years — every single time I leaned against the rail, that quarter-inch side-to-side movement drove me absolutely insane. Higher up, the post felt like a rock. Only the base moved. Most forum threads I found jumped straight to full column replacement, which made zero sense for what was clearly a connection problem, not a structural one.
The reality? Two things kill the base connection on period porches. That’s it.
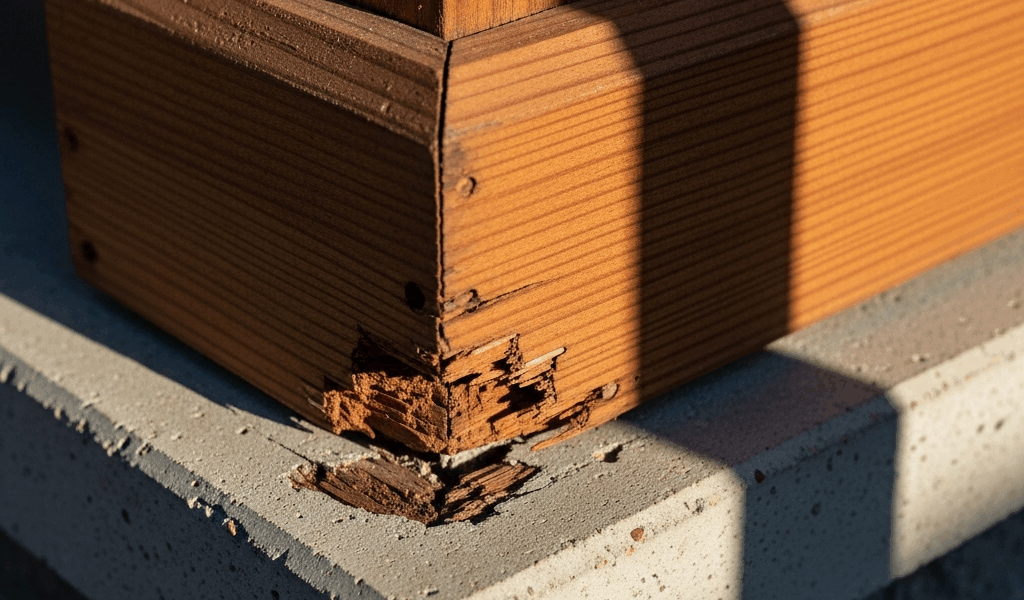
Moisture wicking into the end grain at the post base is the first culprit. The post sits exactly where the porch floor meets the beam — rain spray, deck sealer breakdown, bad flashing — all of it concentrates water right into exposed wood grain. Fibers swell, compress, lose density over decades. The fasteners that once held tight, usually hand-driven nails or toe-nails driven at an angle into the rim joist, end up with nothing solid left to bite into. The wood around them just… gives up.
Then those original fastening methods fail on their own timeline anyway. A toe-nail through a 4×4 post holds great for 40 years. By year 80, wood fibers have shifted, the nail has oxidized, and the whole connection is essentially decorative. You get sideways play with zero actual structural concern for the column itself.
But what is the real distinction here? In essence, it’s this: a wobbly post base means the connection failed. That’s a repair. A rotting post means the wood lost integrity. That’s a replacement. But it’s much more than a semantic difference — most homeowners panic and conflate the two, which is how a $60 fix turns into a $600 project. Don’t make my mistake.
How to Tell If the Post Can Be Saved
Before you touch a single tool, you need a go-or-no-go test. Five minutes. Saves you from a weekend of pointless work.
Grab a stainless steel awl — or honestly, a flathead screwdriver works fine — and probe the wood right where the post base meets the floor. Push with moderate hand pressure. If the point sinks more than half an inch without resistance, the wood is too far gone. You’re replacing the post, full stop. If it sinks a quarter inch or less and hits solid wood underneath, or barely dents the surface at all, keep reading.
Rock the post side to side while you’re crouched down there. Does it move at the base only, or does the whole column shift up high? Base-only movement with a plumb upper column means the connection is loose but the column itself is sound. That’s your green light.
Check the capital — that decorative block between post and beam — and the base trim. Hairline cracks are normal in century-old wood. Gaps wider than a dime suggest real movement. Hold a 2-foot level flat against the side of the post, not at an angle, and verify it’s still vertical. Craftsman posts were set true when they were built. Even a slight lean will bug you forever once you’ve noticed it. I’m apparently very sensitive to off-plumb columns and my 1927 bungalow works for me while newer construction never does.
What You Need Before You Start
Probably should have opened with this section, honestly. Knowing the budget upfront keeps surprises out of the equation entirely.
The material list is short — you’re not replacing structure here. While you won’t need a truck full of lumber or a contractor on speed dial, you will need a handful of specific items:
- Adjustable post base bracket — Simpson Strong-Tie ABU44Z, around $18, handles 4×4 posts
- Construction adhesive rated for exterior wood — Titebond III or equivalent, $12–$15 per tube
- Exterior wood filler — Bondo High-Build Wood Filler hardens fast and stays put, about $8 per can
- Stainless or hot-dipped galvanized wood screws, 3 inches long, #10 gauge — a box of 50 runs roughly $12
- Temporary support: a hydraulic or screw jack rated for at least 2 tons — rental cost $25–$40 per day at most equipment shops
- Basic tools: level, circular saw if needed, paintbrushes, caulk gun, square
The Simpson ABU44Z bracket might be the best option, as this repair requires a modern connection point that actually holds. That is because the century-old fastening underneath has essentially retired — you’re giving the post something engineered and current to sit on instead. That bracket is your MVP. Everything else just supports the process.
Step-by-Step Fix for a Loose Post Base
Frustrated by three separate contractor quotes ranging from $400 to $1,100, I tackled my own post one April weekend using these exact steps — with a $47 total parts cost from the local hardware store on Route 9.
So, without further ado, let’s dive in.
- Support the beam above. Position your screw jack under the beam directly above the post. Center it on solid floor framing. Tighten slowly until the beam just barely lifts — you want resistance, not strain. One quarter turn past snug, then stop. Do not over-jack. You’re unweighting the connection, not lifting the house. These are very different things.
- Clean and dry the base. Wire brush and stiff putty knife. Scrape away loose paint, old caulk, surface debris — everything where the post meets the floor or footing. Wet wood kills adhesive bonds. Use a heat gun on low for ten minutes if needed, or simply wait for a dry day. Wipe everything down with a clean rag. You want bare wood or exposed concrete, not dust and decades of paint layers.
- Fill soft spots. Probe again with the awl. Spongy areas get packed with exterior wood filler — mix per package instructions, overfill slightly with a putty knife. Let it cure fully, a full 24 hours even if the label claims two. Sand flush when hard. This restores bearing surface and stops future fiber compression at those exact spots.
- Apply adhesive and reset plumb. Run a bead of construction adhesive around the bottom 2 inches of the post. Apply another layer to the contact surface where the bracket will sit. Slide the ABU44Z into position between post and structural floor or footing. Lift the post gently back into place — dead plumb on two axes. Use your level and a 4-foot straightedge on uneven bases. An off-plumb Craftsman column looks like amateur work even when the engineering underneath is perfectly sound.
- Fasten the bracket. Drill pilot holes through the bracket mounting holes into the substructure — concrete, rim joist, or floor decking depending on your porch type. Drive your stainless fasteners down snug. Hand-tight plus a quarter turn. The adhesive handles load sharing; the screws hold alignment. Over-torquing accomplishes nothing good here.
- Let adhesive cure. 24 hours before touching the jack. Yes, it’s annoying. No, you cannot skip it. Construction adhesive needs time to polymerize and reach actual working strength. That was a hard lesson — I tried to rush this step on a gate repair in 2019 and reset the whole thing three days later.
- Remove the support jack. Lower it slowly and evenly — one full rotation of the handle every 10 seconds. Watch the post the entire time. It should stay plumb and feel solid immediately. Any uneven settling or shifting means stop and investigate before continuing.
Finishing So the Repair Stays Hidden
That’s what makes Craftsman architecture endearing to us preservation-minded homeowners — the details matter as much as the structure. The bracket is now holding the post true, and the original base trim — typically a routed cap or beveled skirt — should conceal the connection completely. If yours survived, reinstall it over the bracket and fresh adhesive, finish nails set just below the surface.
First, you should track down the original profile — at least if any trim remains intact to measure from. Many architectural salvage suppliers and small woodworking shops stock or can mill period-correct Craftsman base caps. A 1-inch beveled or stepped cap runs $2–$5 per linear foot. Twenty minutes to install. Prime every inch of end grain before paint hits it — unprimed wood drinks paint and looks dull no matter how many coats you apply afterward.
Two coats of exterior primer, then a topcoat of quality porch paint — something like Benjamin Moore Regal Select Exterior in whatever matches your existing trim — seals everything and hides the repair completely. Check the base every spring before painting season. New gaps, cracks, settling — catch them early. A firm post today beats rotted wood in five years. Every single time.


Stay in the loop
Get the latest craftsman charm updates delivered to your inbox.