What a Sagging Porch Beam Is Actually Telling You
Porch beam repair has gotten complicated with all the conflicting advice flying around. As someone who spent three summers helping my father-in-law gut and restore his 1920s craftsman bungalow, I learned everything there is to know about sagging beams the hard way. Today, I will share it all with you.
But what is a sagging porch beam, really? In essence, it’s a structural member that has dropped below its original position. But it’s much more than that — it’s a symptom. And the symptom points to one of three very different problems, each with its own fix.
- Fastener failure — Lag screws, nails, or bolts corrode or back out at the post-to-beam connection. The beam itself hasn’t weakened at all. It’s just slipping downward, slowly, over years.
- End rot at the post junction — Water pools where the beam sits on the post cap. Rot eats through the wood grain and crushes the connection point gradually. This one sneaks up on you.
- Mid-span deflection — The beam has weakened from rot throughout, was undersized from day one, or carries more load than it was ever designed to handle. This is the structural one. This is the one you don’t want.
That’s what makes proper diagnosis so endearing to us DIYers — you don’t fix fastener pull-out the same way you fix rot. Figure out which bucket your beam falls into before you spend a single dollar.
How to Inspect the Beam Before You Touch Anything
Probably should have opened with this section, honestly. Skipping inspection is exactly how homeowners end up paying for a full beam replacement when three new bolts would have done the job.
So, without further ado, let’s dive in. Grab a flathead screwdriver, a straightedge — at least 6 feet long — and about 45 minutes of patience.
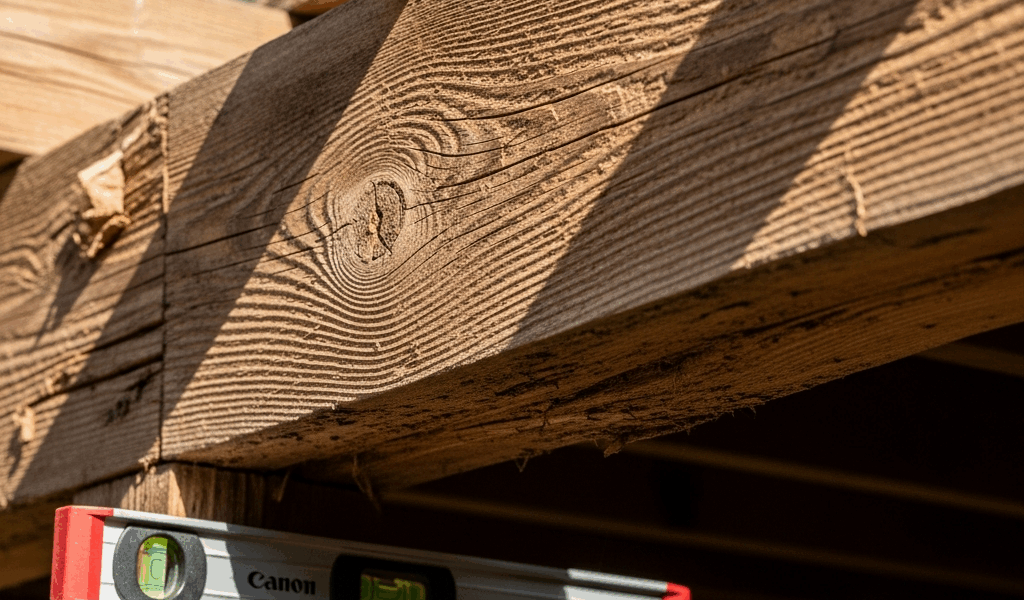
Start at the posts. Find where the beam sits on the post cap and drag the screwdriver tip across the wood grain at a shallow angle. Soft wood that gives way under light pressure means rot. Probe at least three spots per connection — top surface, both sides, and the underside if you can reach it. Write down what you find. Don’t trust your memory.
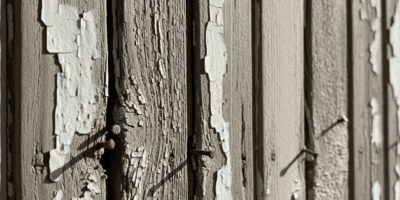
Now look at the paint. A straight cracking line running around the beam perimeter — especially where beam meets post — signals fastener movement. The wood is flexing. Vertical cracks on the beam face are just age checks. Normal. Not urgent. But a gap between the beam and post wider than a credit card? Fasteners are gone or corroded through. Full stop.
Measure the sag last. Lay the straightedge flat along the beam’s underside from post to post, or run a string line and measure the gap at midpoint. Record in sixteenths of an inch — be specific. Four sixteenths, which is a quarter inch, is roughly the threshold for cosmetic settlement. More than that suggests something is actively failing.
One hard stop: soft rot running through the entire beam cross-section — not just the ends, but all the way through — means the beam has lost structural integrity. Call a structural engineer. Don’t guess on that one. That’s the line between a weekend project and a serious mistake.
Everything else? Manageable.
Fixing a Sagging Beam Caused by Fastener Failure
Fastener failure is probably the most common thing I’ve run across, and it’s also the cheapest to fix. Lag screws that backed out over a decade, corroded nails that lost their grip, bolts that rusted solid — all of it produces the same symptom: beam slips down, but the wood is otherwise fine.
While you won’t need a full contractor crew, you will need a handful of specific tools. A hydraulic floor jack — rented for around $40–60 a day at most equipment places — and an adjustable post shore, which you can buy outright for $15–30 at any big-box hardware store. Get the fasteners before you start. Don’t make my mistake of driving to Home Depot mid-repair with the beam half-supported.
Here’s the sequence:
- Place the jack directly under the beam at midspan. It needs a solid surface underneath — concrete pad or floor joist, not soft ground. Raise it until it contacts the beam firmly. You’re supporting, not lifting. Leave an inch or two of clearance.
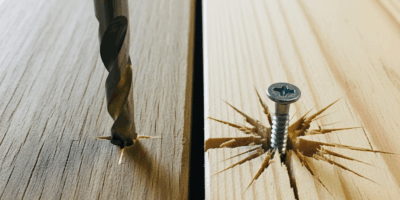
- Remove all old fasteners. Corroded lag screws should be drilled out rather than torn free — tearing destroys the surrounding wood. Bolts, unbolt completely.
- Clean the connection surfaces. Wire brush the debris and old caulk away. Any surface-only soft spots — less than half an inch deep — get a coat of epoxy consolidant right now.
- Install new fasteners. LedgerLOK screws are specifically engineered for beam-to-post connections — half-inch diameter, available in 5.5-inch and 6.5-inch lengths, and they don’t require pre-drilling. Two per connection minimum, staggered vertically. Replacing bolts? Use grade 8 hardware with flat washers and lock washers. Snug-tight, not cranked down.
- Lower the jack slowly — one turn every five minutes. Watch for binding.
Frustrated by his first repair failing within two years, my father-in-law switched from standard lag screws to TimberLOK structural fasteners on his second attempt, using a rented impact driver and a tube of exterior wood glue at the joint faces. That repair held without any movement for eight years. I’m apparently a LedgerLOK person now and that system works for me while standard lags never seem to hold long-term in wet climates.
Repairing Beam End Rot Without Full Replacement
End rot is water damage, not a death sentence — at least if you catch it before it spreads past roughly 30 percent of the cross-section. That’s the threshold. Past that, replacement wins on cost and time.
First, you should chisel away all loose, spongy material — at least if you want the epoxy to bond to something solid. Probe the depth honestly. Rot running more than 2 inches into the beam means replacement is more cost-effective. Surface damage to about 1.5 inches deep? Epoxy repair is your move.
LiquidWood epoxy consolidant might be the best option for the first step, as beam repair requires structural re-hardening of the grain before you fill anything. That is because a filler applied over soft wood will just flex and crack within a season. Inject or brush the consolidant into the affected area, let it cure — usually 24 hours per the product instructions — then come back with WoodEpox two-part filler to bridge gaps and rebuild the bearing surface.
But be honest about limits. On a covered porch with a decent roof overhang keeping rain off the beam, epoxy repair often lasts 15 years or more. On an open or semi-exposed porch where water pools after every rain, you’re looking at a 5–8 year fix at best. Plan for eventual replacement. That’s not a failure — that’s just the reality of wood in wet conditions.
Sand smooth after the filler cures, prime immediately with a water-resistant exterior primer — I used Zinsser Bulls Eye 1-2-3 on my father-in-law’s porch — and paint within 48 hours.
When the Sag Means the Beam Needs to Be Replaced
Three signals make the decision for you:
- Mid-span deflection exceeds half an inch — the beam itself is failing, not the connection hardware.
- Rot penetrates more than one-third of the beam’s vertical dimension — load-bearing capacity is genuinely compromised.
- Radial cracks or checks run the full depth of the beam — structural cohesion is gone.
Replacement means temporary shoring, removing the failed beam, and installing new lumber — often upsized dimensional lumber or an LVL engineered beam — then resetting all connections with new fasteners and bearing plates. It’s a solid weekend project with one helper, or a single long day for a contractor. Labor typically runs $800–2,000 depending on access, beam size, and material choice. The LVL option adds roughly $200–400 in materials but is worth it for spans over 10 feet.
Here’s what all that inspection work actually bought you: a clear answer. Probing for rot, measuring sag in sixteenths, checking every fastener — that 45-minute process tells you exactly whether you’re looking at a $200 fix, a $500 epoxy repair, or a $2,500 replacement. Don’t make my mistake of skipping it and assuming the worst. Or assuming the best, for that matter. The beam will tell you exactly what it needs. You just have to actually look.


Stay in the loop
Get the latest craftsman charm updates delivered to your inbox.