“`html
Why Stain Bleeds Into Craftsman Grain Patterns
I spent three days stripping and re-staining a 1920s oak pocket door frame because I didn’t understand why the stain was pooling unevenly in the grain, creating these dark, almost bruised lines that completely undermined the clean aesthetic the homeowner wanted. Looking back, I should have spent an hour understanding wood grain behavior instead of learning it the expensive way.
Stain bleeding into grain isn’t a mystery—it’s physics meeting wood anatomy. Open-grain woods like oak, ash, and walnut have visible pores running through their cellular structure. These pores are basically highways for liquid. When you apply stain, the wood cells along the grain absorb moisture faster than the surrounding surface, and stain particles follow that water straight down into the pores. The result looks like the stain is bleeding because, technically, it is.
Craftsman-style woodwork makes this problem worse in specific ways. Those exposed joinery details, the visible grain lines in trim work, the deliberate showcase of wood character — all of it becomes a liability when stain bleeds. You’re trying to highlight the joinery, not create dark halos around it. Plus, craftsman joinery often relies on edge-grain surfaces where the grain direction is perpendicular to the face — exactly where stain migration happens fastest.
Wood species matters enormously. White oak has larger, more open pores than red oak. Ash is even more dramatic. Meanwhile, maple and cherry have finer grain structures that resist bleeding naturally. If you’re working with authentic craftsman materials from that era — heavy quarter-sawn oak with pronounced ray fleck — you’re working with one of the most absorbent woods in residential woodwork. The grain raises moisture like a sponge deliberately designed for it.
Temperature and humidity affect how fast the wood drinks. Cold wood doesn’t absorb stain as readily. Humid air keeps the wood’s surface damp longer, which actually helps prevent bleeding because the surface stays wetter and stain particles don’t get pulled as aggressively into the grain. Dry conditions in heated winter spaces? That’s when stain bleeds worst.
How to Stop Stain Bleeding Before It Starts
Prevention works better than any fix. This is where patience pays dividends.
Start with wood selection. If you have choices on species or grain orientation, tight-grain woods bleed less. But if you’re doing authentic craftsman work, you probably don’t have that luxury. You’re matching existing trim or building in period-appropriate materials. So you’re conditioning the wood instead.
The first step is raising the grain intentionally. Take your prepared surface — already sanded to 120 grit — and wipe it down with a damp cloth. Use distilled water or plain tap water. You want the wood visibly wet but not dripping. Let it dry completely. This takes 2-4 hours depending on humidity. What you’re doing is forcing the wood fibers to swell and stand up, so they’ll be easier to sand smooth.
Sand that raised grain down. Use 150-grit paper. You’re not trying to remove much material; you’re knocking the raised fibers flat. Dust completely. Probably should have opened with this section, honestly — most people skip grain raising and then wonder why their finish looks rough.
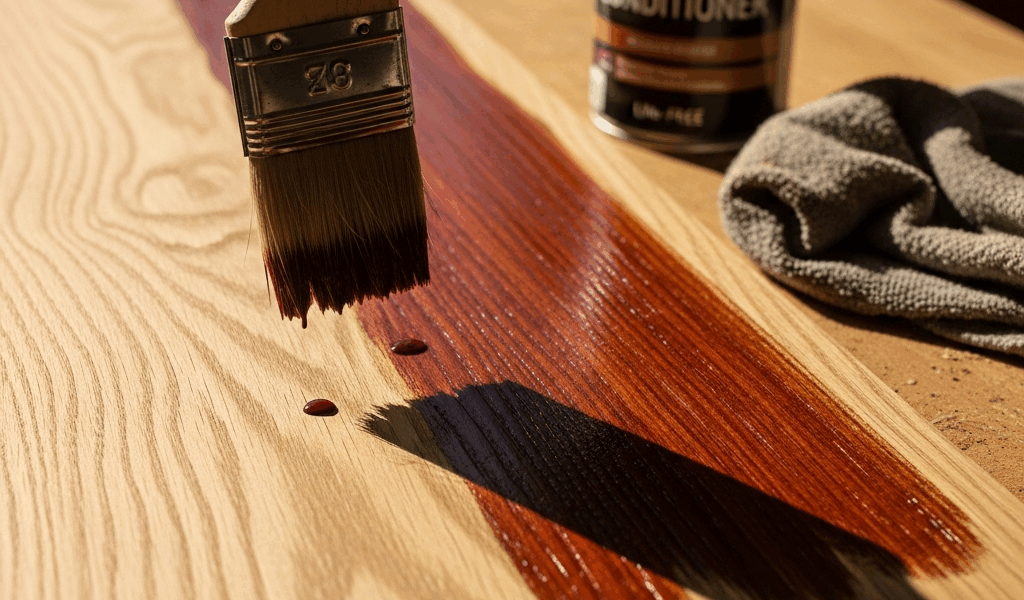
Now pre-condition the wood. This is the critical step that separates controlled finishes from bleeding disasters. Pre-stain wood conditioner (like Minwax Pre-Stain Conditioner on open-grain woods, or Sherwin-Williams ProClassic Pre-Coat on harder woods) seals the outer surface just enough to slow moisture absorption while leaving it porous enough for stain to color the wood. Think of it as a traffic calmer for the stain particles.
Apply conditioner with the grain. A 2-inch natural bristle brush works. One coat, thin application. Let it dry for the time specified on the can — usually 15 minutes for water-based, 30 minutes for oil-based. The surface should look subtly sealed, not glossy.
Sand once more. Use 220-grit paper. Very light pressure. You’re removing the slight surface texture the conditioner creates. This ensures stain particles make clean contact with the wood instead of sitting on a micro-textured surface.
Now comes grain direction strategy. When you apply stain, always work perpendicular to the grain first if you’re dealing with edge grain. This sounds backwards — you want to follow the grain, right? But if you start with the grain direction, you’re moving stain directly into the open pores. Start cross-grain or across the width, then finish with the grain. The final grain-direction strokes blend everything together.
Use the right tool. A foam brush (not cheap foam — something like Purdy’s foam applicators around $4-6 each) holds less stain and deposits it more evenly than bristles. Bristles tend to push stain deeper into grain as they move. Foam doesn’t.
Timing between stain coats matters too. If you need a second coat for color depth, let the first coat dry completely. Minimum 24 hours for oil-based stain on oak. If you recoat too soon, you’re reintroducing moisture to grain that’s already saturated.
Fixing Stain Bleed After Application
You applied stain, it bled, and now you’re looking at those dark grain lines. Here’s the honest truth: it depends on how bad it is and what wood you’re working with.
Light bleeding in oak or ash is often acceptable. You can sand it back and re-stain with a lighter hand. Sand down with 150-grit paper, focusing on the areas with the darkest bleed. You might sand through the stain entirely in those spots — that’s actually fine. Apply one coat of pre-stain conditioner again, wait the full drying time, then sand with 220-grit. Now apply stain with a thinner coat and less pressure on the brush. Oak is forgiving because you can repeat this process 2-3 times.
Maple and cherry are different animals. They show every sanding pass. If stain bled on maple, sanding it out means visible sanding scratches in the lighter areas. You have two real options: live with the bleed and apply topcoat to seal it (honestly, sometimes the bleed isn’t as visible once polyurethane goes on), or sand the entire piece back to bare wood and start over. There’s no graceful middle ground with maple.
Quarter-sawn oak with pronounced ray fleck? If the fleck absorbed stain unevenly, you’re seeing the wood’s natural structure amplified. This is harder to fix because the rays genuinely are more porous. You can sand back and try again with conditioner-stain combination, but the rays will probably accept more color anyway. This is when learning to accept the wood’s authentic behavior is better than fighting it.
If you’re dealing with water-based stain that bled, you caught a break — water-based stain is more forgiving because it dries faster and doesn’t penetrate as deep. Sand back and re-stain with pre-conditioner applied first. Oil-based stain that’s fully cured is harder to reverse because the penetration goes deeper.
Stain and Wood Conditioning Combinations That Work
Combination 1: Oak Trim and Period-Appropriate Results Minwax Pre-Stain Conditioner + Minwax Dark Walnut Oil-Based Stain. This combination is what restoration carpenters use on 1920s-era trim specifically because the conditioner is formulated for open-grain woods. The dark walnut hits authentic color without over-darkening the grain. Two-coat coverage on oak creates depth without bleed.
Combination 2: Ash and Dramatic Grain Definition Sherwin-Williams ProClassic Pre-Coat + Varathane Premium Wood Stain in Espresso. This pairing works because ProClassic is thinner than standard pre-stain conditioner, so it doesn’t over-seal ash’s fine grain structure. Varathane’s stain particles are smaller, which means they deposit more evenly. Results show clean grain definition instead of pooling.
Combination 3: Cherry and Subtle Tones Zinsser Dye Stain Pre-Conditioner + Minwax Penetrating Finish in Red Mahogany. Cherry’s naturally close grain means you can skip traditional pre-stain entirely with this pairing. The dye conditioner prevents any bleed while allowing the stain to show cherry’s natural depth. Single-coat coverage usually sufficient.
These combinations aren’t magic. They’re tested by craftsman woodworkers who do this work repeatedly. Your results depend on timing between steps, drying conditions, and wood species variance.
Preventing Bleed on Your Next Craftsman Project
- Wood Selection: Note the species. Open-grain (oak, ash, walnut) requires pre-conditioning. Tight-grain (maple, cherry) needs lighter touch.
- Surface Prep: Sand to 120-grit minimum. Raise grain with distilled water. Dry completely (2-4 hours). Sand raised grain flat with 150-grit.
- Pre-Conditioning Application: Thin coat, with the grain, using foam brush. Wait minimum drying time per product instructions. Sand with 220-grit after drying.
- Stain Application: Work across grain direction first, then finish with grain. Use foam brush or applicator pad. Single coat for most circumstances; wait 24 hours minimum before second coat on oil-based stain.
- Drying Conditions: Keep room temperature above 60°F. Humidity between 40-60% is ideal. Avoid fresh stain in direct sunlight (causes uneven drying).
- Tool Selection: Foam applicators over bristle brushes. Natural bristle if you must use a brush. Replace applicators between pieces to prevent stain from drying on the tool.
Day-Before Workshop Checklist (Print and Post)
- ☐ Identify wood species on your piece
- ☐ Select pre-stain conditioner appropriate to species
- ☐ Select stain color; verify it matches sample on your specific wood
- ☐ Gather foam applicators (at least 3)
- ☐ Sand to 150-grit minimum; prepare raised-grain water bucket
- ☐ Check temperature: above 60°F minimum?
- ☐ Check humidity: ideally 40-60%?
- ☐ Note drying time for conditioner and stain; calculate full timeline
- ☐ Have 220-grit sandpaper ready for post-conditioning sanding
- ☐ Layout water-damp cloth and timer for grain raising
“`


Stay in the loop
Get the latest craftsman charm updates delivered to your inbox.