“`html
Why Mortise and Tenon Joints Fail in Older Homes
I’ve spent five years now dealing with Craftsman-era furniture and built-ins, and loose mortise and tenon joints are almost guaranteed in pieces that survived a century of seasonal wood movement. The reasons are straightforward enough: humidity cycles cause wood to expand and contract at different rates depending on grain direction, and animal-hide glue—standard through the 1920s and 1930s—breaks down over decades, especially if the piece ended up in a basement or humid climate.
Craftsman builders understood wood moved. Sometimes they designed loose joints on purpose, accepting small gaps as the trade-off for stable furniture. But when joints *shouldn’t* be loose — load-bearing components in chairs or table frames — the problem turns structural, not aesthetic. The wood hasn’t warped or rotted. The glue has just given up.
How to Detect a Loose Mortise and Tenon Joint
Forget the tools for a moment. Run the wiggle test first. Grab both sides of the joint and try moving them separately. If there’s any play — even a millimeter — you’ve found it. A completely tight joint won’t move at all.
Then use light. Position a flashlight or your phone’s torch behind or beside the joint and look for gaps. You want to see if daylight passes through. Hairline separation means the glue released.
The sound check gets overlooked too often. Tap the joint gently with your knuckle. A tight, well-glued joint produces a solid thunk. A loose one sounds slightly hollow or muted — almost deadened. It’s subtle, but after the first two joints your ear catches it.
Context matters here. If the piece is structural — a chair rung, table leg, cabinet frame supporting weight — even small play is a problem. If it’s decorative trim or a panel, you can be more relaxed about tightness.
Filling Gaps Without Disassembly Using Shims and Glue
Probably should have opened with this section, honestly. This method handles gaps up to about 1/16 inch, and it’s the least invasive approach available.
You’ll need:
- Thin wood shims — cedar shingles work fine, and I buy them at any home center for $4 a bundle
- A sharp chisel or block plane
- Hide glue or modern PVA wood glue
- Light clamps or tight rope, not a vise
- Sandpaper in 120-grit and 220-grit
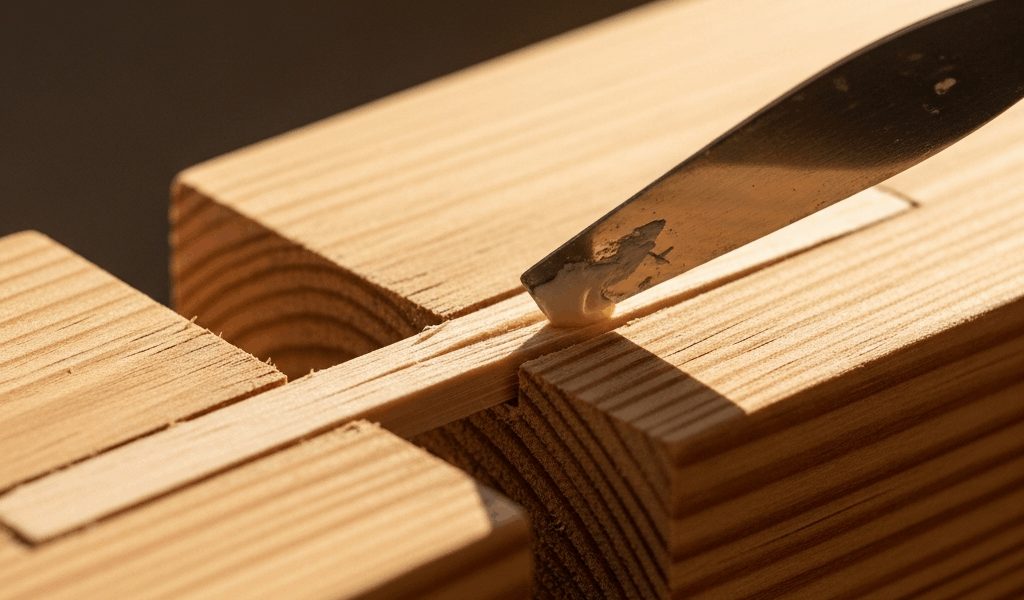
Start by pinpointing where the gap sits. In a mortise and tenon joint, the gap typically appears where the tenon shoulder meets the mortise wall — usually the outer face.
Plane or chisel your shim to match the gap width precisely. This part is critical. A shim that’s too thick creates new problems. Too thin and it falls out. You want it to sit snugly but not force the joint open further. Test-fit it dry first, sliding it in without glue.
Once the fit is right, coat the shim with glue — not soaking wet, just a thin film on both faces. Tap it in using a small hammer and a wood block to distribute the blow. The shim should resist insertion slightly but not require actual force.
Now clamp the joint. Don’t use a bench vise for this — instead, use hand-screw clamps positioned to pull the mortise and tenon toward each other, closing the gap around the shim. If clamps aren’t in your shop, wrap the joint tightly with natural rope and cinch it with a stick tourniquet. Old-school carpenters did this constantly and it works.
Drying time depends on your glue choice. Hide glue sets in 30 minutes but doesn’t reach full strength for 24 hours. Modern PVA glues typically need 12 to 24 hours. Leave the clamping in place the whole time — don’t rush it.
Once dry, sand the shim flush using 120-grit paper first, then 220-grit for finishing. The goal is making the joint look as original as possible. If the shim is visible after sanding, you can stain or finish it to match the surrounding wood, but most of the time it disappears once everything is the same color.
Wood Filler and Epoxy Options for Visible Gaps
Sometimes the gap is too visible for shims, or the joint geometry makes shim insertion impossible. That’s when fillers and epoxies come into play.
Commercial wood filler — the ready-mixed stuff in squeeze tubes or tins — is fast and cheap at $6 to $12 per container. It sands easily and accepts stain reasonably well if you pick a matching color. The downside is purely cosmetic: it looks like filler, not original wood, especially in glancing light. Use it for interior gaps where the joint won’t be seen head-on. It’s also not reversible — once it hardens, removing it requires scraping and damage.
Two-part epoxy — specifically products like System Three SilverTip or West Systems — is harder and stronger than filler. It fills large gaps up to 3/8 inch without shrinking. You can mix in wood dust or saw shavings to color-match and add wood character. The major downside: epoxy is permanent and difficult to reverse if you need to disassemble the piece later. For antiques or pieces you might rebuild someday, epoxy means commitment.
Hand-planed matching wood — this is my preferred method when it’s visible and when I have time. Find a scrap of the same species or something with identical grain and color. Plane thin shavings or splinters, mix them with hide glue into a paste, and trowel the mix into the gap. Once dry, sand flush. It’s original material, reversible if you need to soak it out later, and nearly invisible. The catch: it takes skill and patience.
For Craftsman-era pieces you actually care about, avoid epoxy. Wood filler or matching shavings respect the piece’s integrity and reversibility.
When to Disassemble and Reglue the Joint Properly
There’s a point where filling just masks the problem. You’ll know it when you see it.
If the gap exceeds 1/4 inch, the joint is moving excessively under load, or you’d need multiple shims at one joint, you’re looking at disassembly. A wobbly chair leg isn’t safe to use patched — it needs to come apart and be re-glued properly. Same for a table with visible racking, where it leans to one side.
The process involves heating the joint with hide glue if that was the original adhesive, or chemically softening modern glues, gently pulling the joint apart, scraping out old glue, and reassembling with new adhesive under proper clamping pressure. It’s doable as a DIY project if you have the clamps and patience, but it’s also where a furniture restorer or experienced woodworker earns their fee.
Red flags that suggest professional help: the joint won’t budge even with careful heat and leverage, the tenon shows cracks or splintering, the mortise has enlarged so much new tenon shoulders won’t seat, or structural members like chair legs and table frames are compromised. If you’re unsure whether the joint is safe to use even patched, ask an expert rather than risk a chair collapsing.
The shim-and-glue method I described handles 80% of what people encounter. It’s honest, reversible, and keeps the piece together while you decide if professional work is necessary. Start there. Your future self will thank you for trying the gentle approach first.
“`


Stay in the loop
Get the latest craftsman charm updates delivered to your inbox.