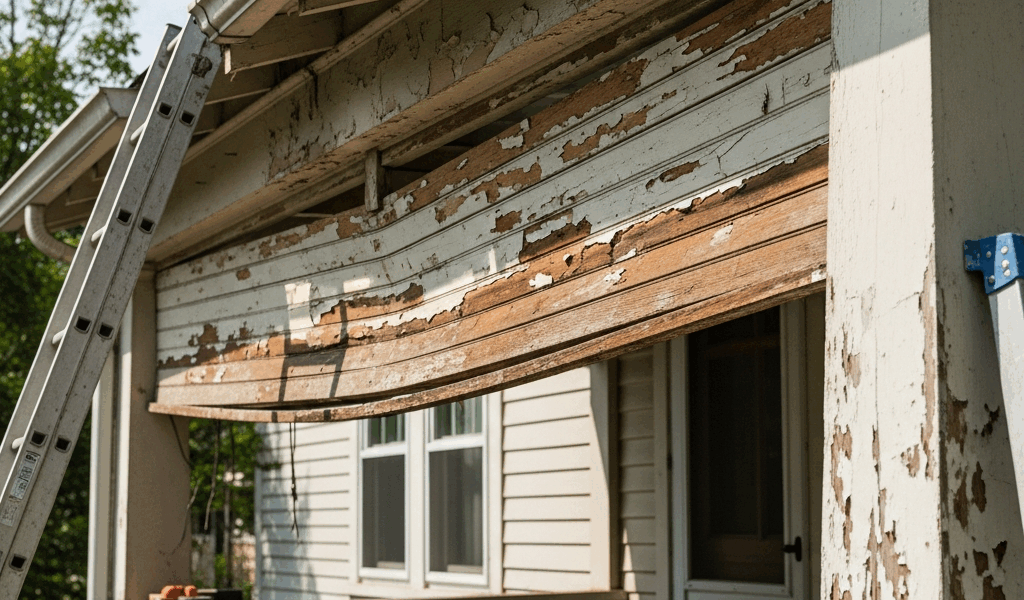
What Causes Craftsman Soffit to Sag
I spent three years restoring a 1924 Craftsman bungalow, and the first structural problem I tackled was the sagging porch soffit. Honestly, I wish I’d understood the root causes before I started swinging a hammer.
Craftsman homes built between 1905 and 1930 used construction methods that differ fundamentally from what we do today. The original fastening was nails — galvanized or plain steel — driven through fascia boards into the ends of blocking or rafter tails. These nails don’t stay tight. Wood moves. It shrinks in summer, swells in winter, and the nails gradually work their way loose over 95 years. By the time you notice sag, you’re looking at fasteners that barely grip anymore.
Water intrusion is the second killer — and honestly, the biggest one I dealt with on my porch. Craftsman porches sit directly below roof eaves with minimal overhang protection. When gutters fail or water drips from roof edges, it wicks into the soffit blocking from above. The blocking materials — usually Douglas fir or hemlock in older homes — absorb moisture and begin to rot from the inside out. I found this in my porch. The blocking looked solid from below but crumbled like wet bread when I probed it from the attic side. Water also pools in the soffit pocket itself when fasteners fail and the soffit board dips, creating a bowl that holds standing water against wood that was never meant to get wet.
Inadequate blocking between rafter tails is a third design issue specific to these homes. Many features 16-inch spacing between rafter ends with no intermediate support blocks. A 10-foot soffit run with only support at the fascia board and maybe the house rim joist will sag under its own weight plus wind load. The blocking, when present, was often undersized — 1×4 or 1×6 lumber where 1×8 would have been better. Over a century, wood loses strength. Softening from age compounds the effect.
Finally, pest damage accelerates the collapse. Carpenter ants love the soffit pocket. Termites too, in warmer climates. The damage spreads silently inside the blocking, and one season the whole thing gives way.
How to Diagnose Soffit Sag Before It Gets Worse
Inspecting your soffit properly takes about 30 minutes and a ladder. Here’s what I do.
Start outside. Step back from the porch and look at the line where the soffit meets the fascia board. It should be level or nearly so. Sagging appears as a visible dip, usually concentrated over a 4-to-8-foot section. Take a photo from the side for reference. Measure the sag using a straight edge or taut string line. I place a 6-foot level horizontally under the soffit and measure the gap below the string. Most craftsman porches show 1/4 to 1/2 inch of sag before it becomes obviously cosmetic.
Now for the poke test — probably should have opened with this section, honestly. Find a spot on the soffit blocking where wood is exposed, typically where the soffit board meets the fascia at a corner or repair seam. Use a screwdriver or awl to push gently against the wood. If it penetrates more than 1/8 inch without resistance, you have rot. Do this at three or four spots. Soft blocking indicates water damage or age-related decay.
Look for visual signs. Water stains on the fascia board — typically dark or greenish streaks — show water flow patterns. Peeling paint suggests moisture movement. Check the bottom of gutters and the roof edge above the soffit for visible moss or debris dam, which means water is pooling where it shouldn’t.
From inside the attic, you can see the full picture. The blocking should be tight against the rafter tails and rim joist. If there are visible gaps, the soffit has dropped. Probe the blocking ends with a screwdriver from inside. Wet or punky wood means decay has progressed beyond cosmetic sag.
Assess fastener failure by looking at nails driven through the fascia into the blocking ends. Are they visibly loose, with small gaps between the nail head and wood? That’s fastener pull-through, and it’s common. Screws are less likely to loosen — which is exactly why modern construction switched to them.
Sagging is cosmetic if the sag measures less than 1/2 inch, no rot appears in the poke test, and fasteners are still functional. Structural concern arises when sag exceeds 1 inch, blocking shows rot, or large sections have lost bearing support.
Repairing Sagging Soffit Without Full Replacement
I’ve executed two repair strategies successfully. Choose based on your sag severity and attic access.
Method 1: Add Interior Bracing (Best for moderate sag with attic access)
You’ll need 2×6 or 2×8 blocking lumber, galvanized 3-inch bolts or lag screws (1/2 inch diameter), and a drill. The goal is to sister blocking — installing new support alongside or above existing blocking to distribute load and restore support.
From the attic, measure the length of the sagging run. Purchase pressure-treated 2×6 lumber in 8-foot lengths — cost runs roughly $12–18 per board in 2024. Cut blocking to fit perpendicular to the rafters, spanning from the rim joist to the rafter wall. Space bolts 24 inches apart, center to center. Drill 1/2-inch holes through new blocking and old blocking simultaneously, then install 3-inch lag bolts with washers. Tighten firmly but don’t over-torque — you risk crushing old wood.
This method avoids removing the soffit. Time investment: 3–4 hours for a typical 10-foot porch. Materials run $80–120.
Method 2: Re-fasten and Reinforce From Below (Best for fastener failure with minor rot)
You’ll need 2.5-inch exterior-grade deck screws — not nails, this is critical — a cordless drill, a 1/4-inch bit for pilot holes, and new soffit blocking if segments are rotted.
Remove the soffit board carefully by unscrewing any fasteners. You’ll likely find galvanized nails that spin freely. Once the soffit is down, inspect blocking. Replace any sections showing soft wood — cut them out cleanly and drop in pressure-treated 1×6 or 1×8. Drill pilot holes through fascia into blocking at 12-inch intervals and drive 2.5-inch screws. The screw threads pull fasteners tight and resist loosening better than nails ever do.
Re-install the soffit board, again using 2.5-inch screws at 16-inch spacing. Seal all seams and fastener heads with polyurethane caulk rated for exterior use. This method takes 4–6 hours and costs $150–250 in materials.
Before you start either repair, confirm the roof decking above is sound. If you find roof sag or soft decking when you probe from the attic, stop and call a professional.
How to Prevent Future Soffit Failure
Water management is everything. I learned this after watching a repaired soffit fail again two years later because I ignored gutter maintenance.
Clean gutters quarterly — more often if you have trees overhead. Debris dams create overflow that runs down fascia and into soffit pockets. I use a gutter brush ($25) on a pole rather than climbing repeatedly. Takes about 20 minutes per side.
Inspect fascia boards annually. Craftsman porches often used cedar, which weathers quickly. Repaint fascia every 4–6 years with quality exterior paint. This seals wood against moisture. Check caulk seams where soffit meets fascia and where fascia meets the house rim. Refresh caulk every 3 years. I use 100% silicone caulk from DAP ($5 per tube) because it flexes with wood movement better than acrylic — I’m apparently particular about that and DAP works for me while cheaper brands never seem to last.
Verify soffit vents are clear. Blocked vents trap moisture inside the soffit pocket. Clear any paint overspray or bird nests. Soffit ventilation should equal roughly 1 square foot per 150 square feet of attic space — original Craftsman porches often have minimal venting, so clear the few vents you have.
Check roof edges after heavy rain. You should not see water running down the fascia. If you do, the roof overhang is inadequate. This is harder to fix retroactively, but you can install a drip edge or extend gutters.
When to Call a Pro Instead
Know your limits. I’ve repaired three soffit systems myself. I passed on a fourth.
Stop if you find structural rot in rafter tails or the rim joist itself. This indicates water infiltration has progressed beyond the soffit system. Replacing rafter ends is not a DIY job. Cost for professional repair: $1,500–3,500 depending on extent.
Mold or visible fungal growth in the blocking calls for professional inspection. Mold remediation often requires containment and specialist removal. Costs range $2,000–6,000.
If the soffit sag exceeds 2 inches or spans more than 15 feet, full replacement is likely more cost-effective than piecemeal repair. Professional soffit replacement on a Craftsman porch runs $1,200–2,800, depending on material choice — wood vs. fiber cement vs. aluminum.
Find contractors who understand Craftsman design. Call local historic preservation organizations for referrals. A good contractor will suggest screw fasteners over nails, match original wood trim profiles, and avoid vinyl soffit systems that look out of place on a 1920s home. Interview at least two contractors. Ask for references on Craftsman-era homes specifically.
The sag you see today became a problem 10 years ago. Address it now, and you prevent worse damage. Your porch will look better and stay dry for another century.



Stay in the loop
Get the latest craftsman charm updates delivered to your inbox.