“`html
Signs Your Craftsman Porch Fascia Is Rotting
I discovered my 1910 Craftsman home’s fascia problem on a Tuesday morning while watering the front beds. One push with my index finger on the lower edge of the fascia board left a permanent indent. That was my first clue something was seriously wrong.
Paint bubbling or peeling in distinct patches usually signals trouble early. Unlike normal paint failure, rot-related peeling clusters in specific zones — typically where the fascia meets the soffit or where gutters attach. You’ll see the paint literally pushing away from the wood, sometimes creating small blisters filled with water.
Dark discoloration comes next. A healthy fascia board maintains consistent color. Rotting wood develops dark brown or almost black streaks, sometimes with a greenish tint from mold growth. Press a screwdriver into the discolored area. Soft, spongy resistance means decay has penetrated.
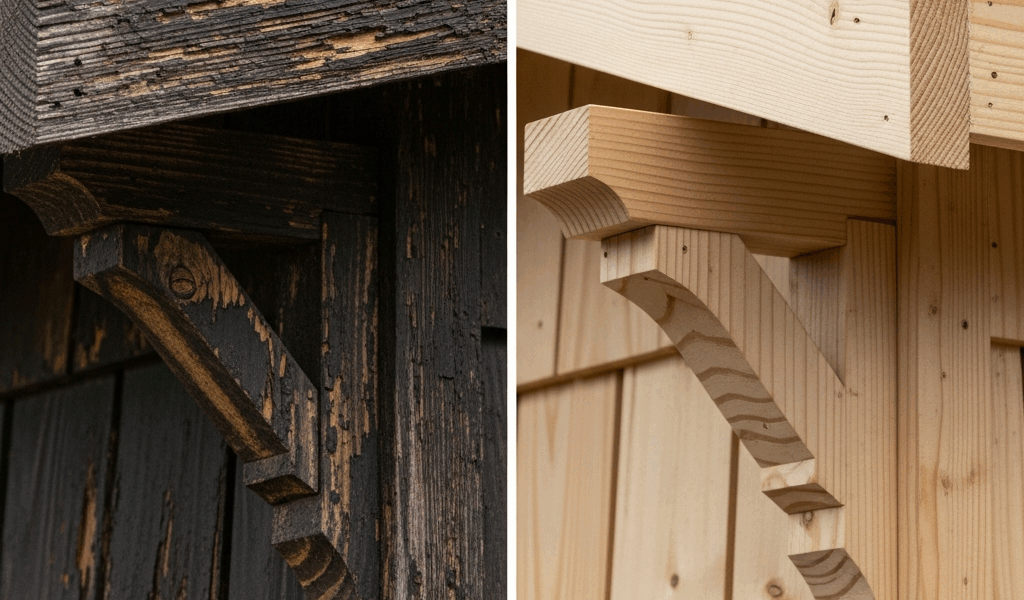
Visible gaps between the fascia and rafter tails? That signals structural movement from wood swelling and shrinking — early rot softens the grain. You might notice the fascia no longer sits flush against the wall or soffit. In my case, a gap appeared between my craftsman trim details and the main fascia board, allowing water even deeper into the void.
Water intrusion is the primary culprit, honestly. Gutters clogged with debris divert water over the edge, soaking the fascia’s top surface continuously. Poor drainage around the porch foundation forces water upward into the fascia base. Age matters too. Original 1900s-era fascia — even cedar — eventually surrenders to decades of moisture cycling. Freeze-thaw cycles in northern climates accelerate the process dramatically.
What You’ll Need to Replace Craftsman Fascia
Before you start demolition, assemble your toolkit and materials. This isn’t complicated carpentry, but precision matters for matching period details.
Tools Required
A pry bar — I used a 12-inch Estwing flat bar, about $18 — removes the old fascia without destroying surrounding soffit and trim. A circular saw (DeWalt DCS391B cordless, roughly $99) cuts new boards to length. A drill with a countersink bit ($40 for a decent Bosch set) handles fastening. Then grab your caulk gun ($12), hammer, tape measure, pencil, and a screwdriver for inspection. If your fascia has decorative corbels or applied trim, add a Japanese pull saw for detail cuts.
Wood Selection — The Architectural Decision
This choice determines whether your repair blends seamlessly or stands out like a Band-Aid.
Cedar remains the traditional choice for Craftsman homes. It resists rot naturally, machines cleanly for period details, and weathers beautifully. A 1x8x12 clear cedar board costs $22–28. If the original fascia was cedar and still shows grain character, match it exactly. I sourced mine from a local mill that carried 5/4 (actual 1 inch thick) Alaskan yellow cedar — closer to original specifications than big-box store options.
Redwood offers similar properties and period authenticity but runs $26–32 for the same dimensions. It’s slightly softer than cedar, demanding more careful fastening and finishing.
Pressure-treated lumber ($12–16 per board) works for budget-conscious DIYers but requires careful staining or painting — the green-tinted preservatives bleed through standard finishes. It also lacks the fine grain detail that defines Craftsman aesthetics. Honestly, pressure-treated fascia on a 1910 home, even if hidden, always feels like a compromise.
Fascia Dimensions for Craftsman Homes
Standard modern fascia is 1×6 (actual 5/8″ thick, 5.5″ wide). Craftsman porches typically used 1×8 or even 1×10 boards. Measure your existing fascia width and thickness. Take a photo of the board profile — Craftsman fascia often features a routed edge detail or beveled top that sheds water. Don’t assume what’s underneath. You might be removing a 1×10, and ordering a 1×6 replacement guarantees a poor match.
Fasteners and Sealants
Use stainless steel fasteners (not galvanized) to prevent rust staining on cedar. 2.5-inch ring-shank stainless nails or 2-inch stainless screws cost more — $15–20 per pound — but last the life of the wood. Cheap galvanized fasteners corrode within 5–7 years.
An exterior-grade acrylic caulk rated for wood-to-wood joints seals the fascia-to-soffit seam. Sikaflex 11FC ($8 per cartridge) handles movement better than cheaper alternatives. Avoid polyurethane if you’re staining — it repels stain and creates visible lines.
Budget Expectations
A single-story porch fascia replacement (roughly 20 linear feet) runs $200–350 in materials for quality cedar and finishing supplies. Add $100–150 if you’re replacing gutters or addressing soffit damage simultaneously. Professional contractors charge $800–1,500 for the same job, depending on region and trim complexity. My full porch cost me $280 in materials and a Saturday morning’s work.
Step-by-Step Fascia Removal and Replacement
Removal — The Careful Part
Stop the gutters from hanging freely. Support them with a 2×4 prop or rope tied to a porch post. You’re not removing gutters yet — just preventing them from dragging your new fascia down when you install it.
Starting at a corner, slide your pry bar behind the fascia board. Small, patient movements preserve the soffit and trim. I learned this the hard way. Driven by impatience during my first attempt, I cracked a soffit panel. Slow is faster. Work one section at a time, breaking the old caulk seals before applying serious pressure.
Once removed, inspect the rafter tails (the exposed beam ends that support the fascia). Press your screwdriver into each one. Soft spots mean rot has spread beyond the fascia — this complicates your job and might warrant contractor involvement. Check the blocking (the horizontal support piece) and any decorative corbels. Take photos before removal so you remember the assembly sequence.
Substrate Preparation
Scrape away old caulk, paint, and loose material. Sand the rafter tails smooth, especially the top surface where your new fascia will rest. This contact surface must be clean and solid. If you find rot in the rafter tails, you’re cutting new blocking and reinforcing the structure — that’s beyond a standard DIY fascia swap.
Prime all surfaces with an exterior wood primer (Benjamin Moore Fresh Start, $30 per gallon). This prevents the rot cycle from restarting immediately. Yes, it adds a step. No, you can’t skip it. I learned this the hard way with a rushed project in 2015.
Cutting and Fitting New Fascia
Measure each fascia section separately — porch geometry is rarely perfectly square. A 20-foot run doesn’t mean you cut one 20-foot board. Measure, then measure again. I use a tape locked at the zero point against the corner, checking both ends of each section.
Cut square ends where sections meet at inside corners. For outside corners, use a 45-degree miter if you want authentic Craftsman detail. A 45-degree joint on a 1×8 requires precise work. Use a chop saw with a fine-toothed blade (Festool carbide blade, $40) for clean cuts. Rough cuts telegraph weakness in a finished fascia.
Fit the board dry before fastening. Alignment matters for soffit connection and gutter support. Mark fastener locations — typically 16 inches on center, staggered top and bottom to prevent splitting.
Fastening Strategy
Stainless screws hold better than nails in cedar. Pre-drill holes with a countersink bit sized to your fastener. This prevents splitting and allows you to embed screws slightly below the surface for later filling. Drive screws at a slight downward angle — this wedges the fascia down against the rafter tail rather than pulling upward.
Spacing matters. Too tight (fasteners every 8 inches) creates a rigid connection prone to splitting as the wood moves seasonally. Sixteen inches is the standard. Three fasteners per 8-foot section is typical for fascia without gutters attached. With gutters, increase to five fasteners to handle the load.
Sealing Joints
Caulk every joint — between fascia sections, between fascia and soffit, between fascia and trim. Use your caulk gun with a 3/32-inch tip for a bead that’s small but substantial. Overfill slightly. After 15 minutes, when the caulk is tacky but not fully cured, smooth it with a wet finger or caulk tool. This eliminates gaps and creates a uniform appearance.
Let caulk cure fully (24 hours minimum) before painting or staining.
Finishing Your New Fascia to Match Craftsman Style
Stain versus paint divides Craftsman homeowners. Original porches ranged across both, but the consensus leans toward painted fascia with stained trim.
If your original fascia was stained cedar, match that character. If it was painted, stay painted. Mixing finishes on fascia and trim looks disjointed. That’s what makes the finishing decision enduring to us homeowners — it either honors the original home or it looks like a repair. Probably should have opened with this section, honestly.
Period-Appropriate Colors
Deep greens (Benjamin Moore 2133-20 Calico Green or Sherwin Williams SW 2848 Evergreen Fog) appear on Craftsman homes across the country. Warm browns (Benjamin Moore HC-168 Roasted Sesame or Sherwin Williams SW 6076 Humble Brown) echo original exterior stain colors. Muted grays (Benjamin Moore HC-172 Hale Navy with reduced saturation, or Sherwin Williams SW 7693 Silver Strand) suit modern Craftsman interpretations.
Avoid bright whites or saturated colors. Craftsman aesthetics prize restraint and naturalism — colors recede rather than demand attention.
Application Technique
Two coats of exterior paint (Sherwin Williams A-100 Exterior Latex or Benjamin Moore Aura Exterior, both around $60–70 per gallon) provide durability. First coat goes on thin, covering completely. Second coat, applied after 2–4 hours, builds film thickness and hides brush marks.
For stained fascia, apply one coat of exterior wood stain (Minwax Helmsman Spar Urethane, $20, or Sherwin Williams Exterior Wood Stain, $35) and follow with a polyurethane topcoat (2 coats, $25 total). Staining requires 48–72 hours curing before gutter reinstallation. Paint cures faster — typically 24 hours in dry conditions.
Brush application beats spray for detail work. Stain and paint settle into grain and trim profiles more reliably when brushed. A quality 2-inch angled brush ($15–20) lasts through multiple projects if you clean it properly.
When to Call a Pro Instead
I’m apparently someone who gravitates toward DIY solutions, but rot respects no ego. Stop and hire a contractor if:
- Rot extends into rafter tails or soffit panels. Repairing structural components requires understanding load paths and building codes.
- Your porch is second-story or complex (wraparound, multiple levels). Working at height with complicated geometry multiplies the risk of poor results and personal injury.
- Decorative corbels, applied trim, or custom moldings integrate with the fascia. Replicating period details demands carpentry skills beyond basic board replacement.
- Extensive rot (more than 25% of the fascia run shows soft spots) suggests underlying moisture problems. A professional inspection identifies whether gutters, soffit, or foundation drainage needs remediation.
Hiring a contractor costs $800–1,500, but you get a warranty, insurance coverage, and peace of mind. For a $300,000+ home, that’s a reasonable investment in preserving curb appeal and structural integrity.
My fascia is now three years into its new life — the stain has weathered beautifully, softening to a rich patina. The joints remain sealed and secure. That porch finally looks like it belongs to the rest of the house again.
“`


Stay in the loop
Get the latest craftsman charm updates delivered to your inbox.