Why Craftsman Window Sashes Stick in the First Place
Craftsman window repair has gotten complicated with all the generic advice flying around. As someone who spent the better part of a decade working on homes built between 1905 and 1930, I learned everything there is to know about original wood double-hung windows. Today, I will share it all with you.
Most online articles treat window sticking like it’s a one-size-fits-all problem. It isn’t. Original Craftsman sashes fail for three specific reasons — and each one demands a completely different approach.
Probably should have opened with this section, honestly. Diagnosing which of these three you’re dealing with saves hours of unnecessary work.
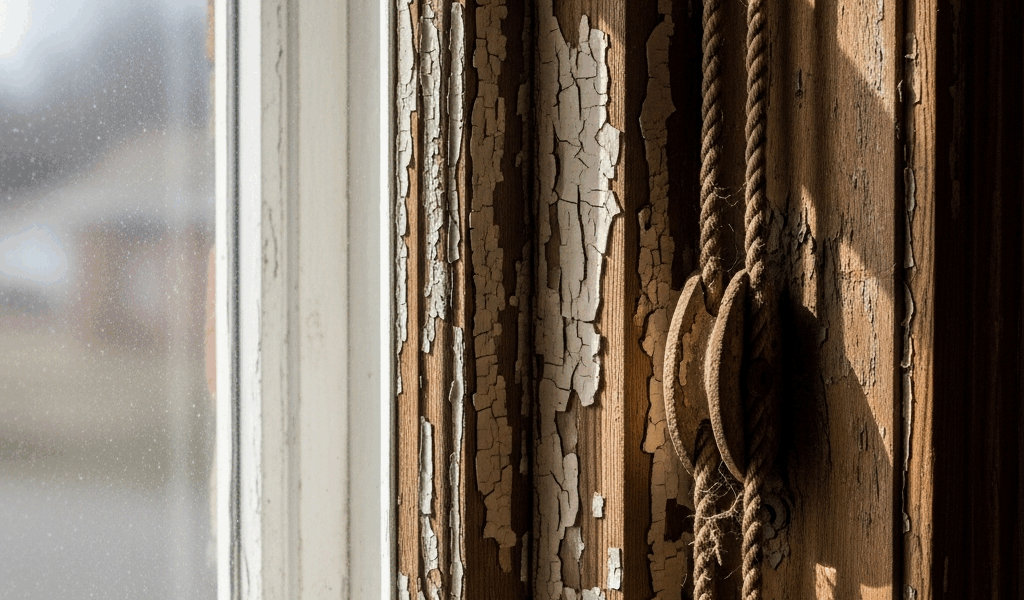
The first cause is paint buildup. Ninety-plus years means ten, fifteen, sometimes twenty coats layered into the channels. Paint doesn’t just coat the wood — it bridges the gap between the sash and the stops, creating a seal so tight that forcing the window risks cracking the glass or splitting the muntins clean through.
The second cause is wood swelling. These windows were engineered around seasonal humidity. Summer brings moisture absorption and expansion. Winter brings shrinkage. After a century of that cycle, wood fibers compress and stop returning to their original dimensions. Add cracked glazing or poor weather sealing, and water penetration swells the sash edge directly.
The third cause — the one most people completely ignore — is failed parting beads. But what is a parting bead? In essence, it’s the narrow wooden strip separating the upper and lower sashes inside the frame. But it’s much more than that. On original windows, these are held by friction and old glue alone. When they dry out or get paint-locked, they compress into the channel and squeeze the lower sash from both sides simultaneously.
That’s what makes diagnosing the actual cause so valuable to us Craftsman homeowners. Sash sticks worse in August than November? Seasonal swelling. Sticks year-round with zero give at all? Paint lock. Parting bead sitting visibly lower than it should? There’s your problem. So, without further ado, let’s dive in.
What You Need Before You Start
While you won’t need a truck full of power tools, you will need a handful of specific hand tools. I’m apparently aggressive with orbital sanders — I found that out after I destroyed a 1920s muntin profile in roughly thirty seconds. Don’t make my mistake.
- A utility knife or sash saw (serrated backsaw, $12 to $25 at any hardware store)
- A stiff putty knife, 1 to 1.5 inches wide
- 80-grit and 120-grit sandpaper
- Boiled linseed oil or paste wax — furniture wax specifically, not floor wax
- A rubber mallet, 2 to 3 pounds
- A small paintbrush for oil application
No pry bar. No power sander. No window replacement. I’ve freed sashes that hadn’t moved since the Eisenhower administration using nothing but that list above.
Breaking the Paint Seal Without Damaging the Sash
This is where damage actually happens. Someone wedges a flat bar between the sash and the stop bead, leans back hard, and suddenly there’s a crack running straight through the glass. The sash frame on these windows is typically 1.125 inches thick. It splinters with surprisingly little provocation.
First, you should start on the interior side — at least if you want any control over what happens next. Take your utility knife or sash saw and score the paint line where the sash meets the stop bead on both sides. Two or three passes, light pressure. You’re cutting the paint film, not carving the wood.
Do the same thing along the parting bead line, top to bottom on both sides.
Now the putty knife. Insert it into the channel itself — not between the sash and the stop. Tap it gently with the mallet to work it deeper. The channel lip becomes your fulcrum, distributing pressure across the full sash width rather than concentrating it at one point.
Tap the mallet. Don’t swing it. Work both sides completely before attempting to lift anything. Then grip the bottom rail at its center and lift evenly with both hands.
When the Sash Is Swollen, Not Painted Shut
Water staining around the sill edge is your diagnostic clue here. Darker wood around the sash perimeter means moisture has been sitting there. Check the glazing compound — cracked or missing putty lets rainwater directly into the channels.
Swollen sashes feel different from paint-locked ones. There’s some play, some initial movement, but binding happens partway through the travel. It might slide freely in January and refuse to budge in July.
The honest fix requires removing the sash and sanding the edges. But sand the channel first, not the sash. 80-grit on the stop beads and parting bead removes paint buildup and smooths rough spots. Then 120-grit on the sash edges only — the exposed edges, not the face. You’re removing maybe 1/32 of an inch. Light strokes, consistent pressure.
Seal raw wood immediately afterward with boiled linseed oil. One or two coats, brushed or wiped on, dried fully between applications. It slows moisture absorption considerably.
Getting the Sash to Stay Smooth for More Than One Season
Frustrated by windows that stuck again within twelve months, I started looking at moisture control rather than just lubrication — and that changed everything.
Paste wax might be the best option for channel lubrication, as Craftsman window maintenance requires something that both lubricates and sheds water simultaneously. That is because oil-based paint does the opposite — it traps moisture underneath and accelerates exactly the swelling you just fixed. Switch to water-based exterior paint on channels, or skip paint entirely and use paste furniture wax applied with a cloth, buffed dry. Reapply every two or three years.
Replace compressed or damaged parting beads. New parting bead stock runs $0.50 to $1.50 per linear foot at specialty millwork suppliers. If your profile is unusual, a millwork shop can reproduce it from a sample piece. Use hide glue for installation — it’s reversible, which matters enormously for restoration work.
Fix any cracked or missing glazing putty. That’s the moisture problem at its actual source, not a cosmetic issue.
This new understanding of wood moisture control took off in restoration circles several years back and eventually evolved into the whole-house approach enthusiasts know and practice today. The sticking sash is connected to the same moisture cycle that rots porch steps and deteriorates exterior trim. Fix the window right, and you’re protecting the entire wood structure — not just one sash.


Stay in the loop
Get the latest craftsman charm updates delivered to your inbox.