Craftsman Porch Column Base Rotting — How to Fix It
Craftsman porch repair has gotten complicated with all the contractor horror stories and YouTube rabbit holes flying around. As someone who ignored a dark patch on my bungalow’s column base for three full years, I learned everything there is to know about what happens when you let rot win. Today, I will share it all with you.
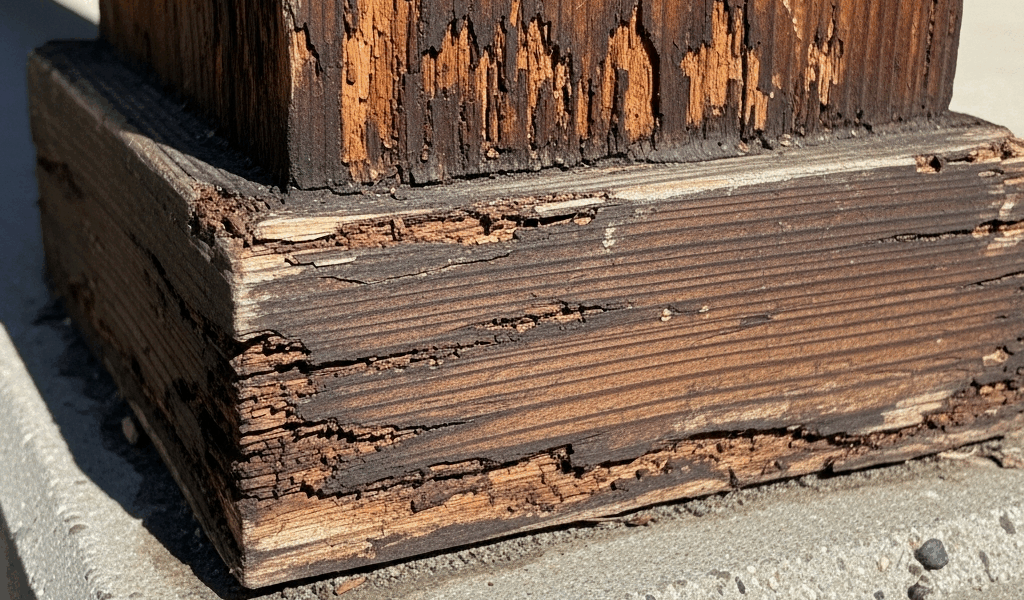
That soft spot at the bottom of your column? It doesn’t get better on its own. Mine went from a cosmetic smudge to a structural embarrassment — and the only thing that changed between those two stages was time. If you’ve noticed craftsman porch column base rotting, you’re staring at one of the most predictable failure points on any early-20th-century home. Wood meets concrete. Moisture pools. Freeze-thaw cycles chew through caulk. The decorative profile catches water like a tiny ceramic bowl. This is exactly the zone that separates a $200 Saturday fix from a $2,000 column replacement.
Most rot you’ll find is cosmetic. You can fix it yourself — no contractor estimate, no power tool obsession required. But you need to move before it climbs into the structural core.
How Bad Is It Really — Probing the Rot
Don’t buy anything yet. Don’t even pick up a chisel. Grab a flathead screwdriver first and push it hard into the soft wood.
Sinks in smooth with zero resistance? The rot is deep. Stops after a quarter-inch? Surface damage only. That distinction decides everything about your next three hours.
Craftsman columns are often hollow — the decorative base and shaft wrapped around an empty core or a single central post. Surface rot on the outer shell is one thing. Rot that’s reached the interior support post is something else entirely. Don’t assume the worst until you actually probe it.
Run the screwdriver upward from the damage. Twelve inches. Eighteen. Twenty-four. Firm wood all the way up means localized rot — good news. Softness climbing the shaft means moisture has migrated vertically through the grain. That’s the pattern that kills columns dead.
Watch for these specific red flags: a visible gap opening between the base and the capital up top, any lean or tilt when you push on the column, soft wood traveling more than a few inches up the shaft, or damage concentrated on the house-facing side where load transfer actually happens. Any of those and you’re in replacement territory, not repair territory. Skip ahead to that section.
For surface and shallow rot, keep reading.
What You Need Before You Start
Probably should have opened with this section, honestly. Discovering you’re missing epoxy consolidant halfway through excavating a column base is how a Saturday project bleeds into a three-week eyesore covered in blue painter’s tape.
Here’s the actual list:
- Epoxy wood consolidant — Minwax High Performance Wood Hardener or Bondo Wood Epoxy Consolidant, around $12–18 per container. This re-hardens partially rotted fibers before you fill anything. Don’t skip it.
- Two-part epoxy wood filler — Bondo Wood Filler or Elmer’s Carpenter’s Wood Filler both work. Grab two containers if the damaged area is bigger than a half-dollar coin.
- Exterior-grade primer and topcoat paint matched to your column. Interior paint on exterior trim is a mistake you’ll repaint in 18 months. Sheen matters on Craftsman details — flat trim gets flat paint, satin gets satin. A glossy finish on a Craftsman column base reads wrong immediately and will bother you every single time you pull into the driveway.
- Chisels — a 1-inch and a half-inch if you have them. A single sharp 1-inch handles it fine.
- Oscillating multi-tool with a wood-cutting blade — DeWalt DCS356 or Bosch GOP40-30C, roughly $60–80 if you don’t already own one.
- Sandpaper in 80-grit and 150-grit.
- Disposable 2-inch paintbrushes for primer and topcoat.
- A caulk gun and exterior-grade paintable caulk for sealing the base-to-floor joint afterward.
Total materials: $100–140, give or take. That’s one-tenth the cost of a contractor visit and about one-third the price of a replacement column.
Removing the Rot Without Damaging the Column
Start slow. Use the chisel at a low angle, working along the grain, pulling out only the visibly soft wood. You’re excavating, not demolishing. The goal is a clean cavity — firm wood walls on every side, no crumbling edges.
Once the obvious damage is cleared, switch to the oscillating tool with a cutting blade. Undercut the edges slightly to give the epoxy filler a mechanical grip. Go easy on hollow columns — aggressive cutting punches through the opposite shell wall faster than you’d expect.
Now the step most people blow past and later regret: dry the cavity completely. A heat gun works best. A standard hair dryer works fine too — I’ve used one. Let the exposed wood sit open for 24 hours if weather allows. Epoxy consolidant bonds poorly in damp wood, and the wood almost always holds more moisture than it looks like it does. I applied consolidant too early on my first attempt. It bubbled. Don’t make my mistake.
Once it’s genuinely dry, brush the consolidant into the cavity according to the product directions. Let it cure fully — 4 to 6 hours typically. This re-hardens the remaining damaged fibers and gives the filler something solid to grip. Skipping this step means your beautiful epoxy patch is bonding to crumbling wood. It’ll fail within a year.
Rebuilding the Base and Making It Last
Mix the two-part epoxy filler and apply it in layers — not one thick pour. Craftsman bases have real decorative detail: fluting, stepped edges, molded profiles. A single overstuffed application sags before it cures and cracks afterward. Quarter-inch layers, fully cured between applications, give you control over the final shape and a more durable result.
Overfill intentionally. Sand it back once cured. Start with 80-grit on a sanding block to knock down the bulk, then follow with 150-grit for surface smoothness. Match the original profile as closely as you can — it won’t be perfect, and that’s fine. It will be structurally sound and visually close enough that nobody standing on the sidewalk notices anything.
Prime the bare epoxy before painting. Topcoat directly over epoxy peels — sometimes within months. Two thin coats of exterior primer, then your topcoat paint in the right sheen. I’m apparently a Sherwin-Williams Duration person and it works for me while the cheaper stuff never seems to hold color on sun-facing trim.
Then do the thing that actually prevents a repeat repair: caulk the joint where the column base meets the porch floor. Paintable exterior caulk, caulk gun, smooth bead, paint over it. That gap is a water collector. Seal it and the whole moisture trap that started this mess stops functioning.
When to Replace the Column Instead of Repairing It
But what is structural rot, really? In essence, it’s damage that has reached the load-bearing core — the primary support wood inside the column. But it’s much more than that. It’s the point where consolidant and epoxy filler stop being solutions and start being cosmetic theater.
Signs you need a full replacement: the column shifts or leans when you push it, the gap between base and capital is visibly widening, soft wood extends more than several inches up the shaft, or the house-facing side is compromised where load transfer happens. Any one of those means repair is just postponing the inevitable.
Here’s the part most people don’t know: the majority of porch columns on Craftsman homes are decorative, not structural. The actual load transfers through posts or beams set behind or beside the visible column. You can pull a decorative column and swap it in an afternoon. Pre-made Craftsman-style replacement columns run $150–400 depending on size and profile complexity — and they arrive ready to install and paint.
If your column is genuinely structural — carrying real roof load — that’s a contractor conversation with temporary shoring involved. That’s a different job entirely. But nine times out of ten, that soft base is a surface problem on a decorative detail. Fix it this weekend. Your curb appeal and your porch floor will both thank you.


Stay in the loop
Get the latest craftsman charm updates delivered to your inbox.