Why Craftsman Porch Columns Bubble More Than You’d Expect
Craftsman porch column paint bubbling has gotten complicated with all the conflicting advice flying around. As someone who owns a 1927 Colonial Revival and watched all four front columns blister out within a single spring, I learned everything there is to know about why this keeps happening. Today, I will share it all with you.
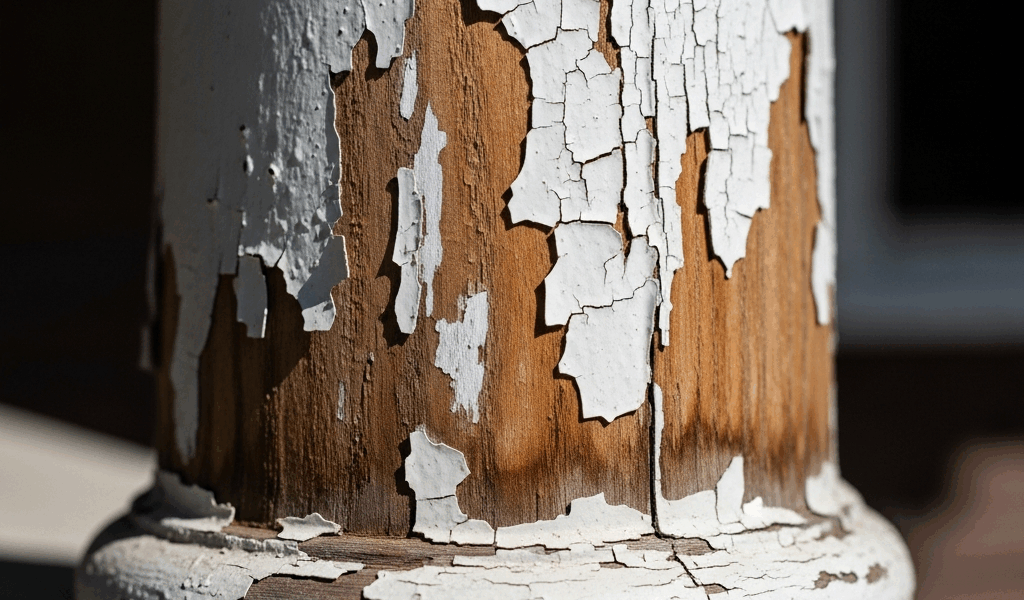
But what is a Craftsman column, structurally speaking? In essence, it’s either a hollow wooden form built around a core, or a stave-built column — essentially wooden shingles bundled and wrapped with a base and capital. But it’s much more than that. It’s a moisture trap that flat siding simply doesn’t replicate. Water doesn’t just sit on the surface. It migrates into the end grain at the base, works its way up through the hollow cavity, and builds real pressure behind the paint film.
The capital — that decorative top piece — is its own weak point. Poorly sealed joints let rain and condensation seep in and pool inside. By midsummer you’ve got a hollow wooden structure that’s essentially a moisture reservoir wrapped in paint that’s desperately trying to hold everything together.
End grain absorption is the culprit nobody talks about enough. Wood’s end grain soaks up water roughly ten times faster than face grain. On a column, you’ve got exposed end grain at the bottom where it meets the porch deck and around the capital trim. Paint doesn’t bond well to end grain on a good day. Add trapped moisture pushing from the inside and the paint has nowhere to go but outward — straight into those blisters you’re staring at right now.
How to Tell If It’s Moisture or Just a Bad Paint Job
Probably should have opened with this section, honestly. Diagnosing wrong means fixing the wrong thing, which is exactly how you end up repainting over the same problem twice in three years.
Here’s the field test. Find a bubble that formed recently — something that looks fresh rather than cracked and weathered. Press on it firmly with your fingernail or a scraper edge. Liquid comes out? That’s moisture trapped beneath the film. The paint itself may actually be fine. The substrate is the problem.
Dry and hollow-sounding bubble? That’s adhesion failure. Usually means there was old glossy latex or oil-based paint underneath that the new coat never actually bonded to. Or the column got painted in direct afternoon sun — surface temps hit 95°F, air pockets form instead of a seal, and you’ve got bubbles before the job even cures.
Check the pattern too. Moisture-driven bubbling starts low and climbs, especially on the shaded north-facing side. It clusters around seams and that base joint. Adhesion failures show up randomly — large sheets of paint lifting rather than small individual blisters.
One more step before you reach for a scraper: press a flathead screwdriver into the bottom few inches of the column where it meets the deck. Solid wood pushes back. Soft or crumbly wood means rot. If the wood itself is compromised, everything else is temporary theater. Don’t make my mistake — I patched and painted a column base in 2019 without checking. Replaced the whole lower section in 2021. Cost me about $600 that a five-second screwdriver test would have prevented.
What You Need Before You Start the Repair
While you won’t need a truck full of specialty tools, you will need a handful of specific items. A 4-inch flexible putty knife works better than a rigid scraper on curved column surfaces. A heat gun is optional but genuinely helpful for softening stubborn old paint. A 3-inch orbital sander loaded with 80-grit paper for feathering edges. Painter’s tape. A 2-inch angled brush. An infrared thermometer — a decent one runs about $25 on Amazon — to check surface temperature before you commit to painting.
For materials: 100% acrylic paintable caulk for base and capital gaps, oil-based primer for end grain (non-negotiable), quality exterior acrylic finish paint, and mineral spirits for cleanup after the oil primer work.
Oil-based primer might be the best option here, as column repair requires proper end grain sealing. That is because acrylic primers simply don’t penetrate end grain the same way — they sit on top rather than locking in, and that’s where the whole system eventually fails.
Confirm no active rot before buying anything. Soft base means call a restoration contractor first. Painting over rotted wood guarantees failure inside of six months. The difference between catching it now versus later is roughly $300 in repair materials versus $2,000-plus in column replacement.
Step-by-Step Fix for Paint Bubbling on a Wood Column
Step 1: Scrape all bubbled paint. Remove every bubble and anything that sounds hollow when you knock on it. Work outward from the bubble in a circular pattern rather than just popping the blister. Go all the way to bare wood where you can. Bare wood is genuinely better than a thin ghosted layer of old paint left underneath — that remnant becomes a weak bond point for everything above it.
Step 2: Sand and feather all edges. Anywhere you’ve scraped down, use 80-grit to feather the transition smooth. Skipping this leaves a visible ridge through the topcoat. Feathering each spot takes maybe 30 seconds. It’s not glamorous work but it’s the difference between a clean finish and something that looks patched.
Step 3: Prime exposed end grain with oil-based primer. This step determines whether you’ll be back out here scraping again next July. Use Zinsser Cover Stain or Kilz Original in the oil-based version — not the water-based reformulation. Two thin coats, minimum four hours between them. I’m apparently sensitive to the fumes and work with a respirator; Cover Stain works for me while brush-applied acrylic primer never holds on end grain.
Step 4: Caulk the base joint and capital gaps. Once primer cures, run a bead of 100% acrylic caulk where the column base meets the porch deck and where the capital meets the shaft. Tool it smooth and let it skin over fully before the next step. This is the moisture re-entry prevention — seal it properly or the whole repair has a timer on it.
Step 5: Apply a finish primer coat over repaired areas. One coat of acrylic exterior primer feathered over all scraped sections and caulked joints, blending into the surrounding existing paint.
Step 6: Two coats of exterior finish paint. Sherwin-Williams A-100 Exterior or Benjamin Moore ben Exterior are solid, proven choices in the $55–$70 per gallon range. Don’t cheap out at this stage. You just spent real time on the substrate work underneath — a better paint holds longer, and that’s the whole point.
How to Stop It From Bubbling Again Next Season
Fixing the bubbles doesn’t fix the hollow column. That’s what makes moisture management endearing to us old-house owners — it never fully goes away, but you can control it.
Some restoration specialists drill a 1/4-inch weep hole at the very base of each column, hidden on the rear side. It lets trapped moisture escape instead of building pressure behind the paint film. It works. I drilled mine in October 2022 and haven’t had a bubble on those columns since — that’s two full seasons now.
Timing matters more than most people realize. Paint only when the column is genuinely dry and the forecast stays dry for at least 48 hours after application. Surface temperature should hold between 50°F and 85°F — that infrared thermometer earns its $25 right here. I’ve made the mistake of starting at 7 AM when the column was still damp from overnight dew. The bubbling came back within eight months. Don’t make my mistake.
First, you should check your drainage situation — at least if you want the repair to actually last. If water pools at the column base or the deck doesn’t slope away from it, the paint will keep failing regardless of how carefully you prime. Paint is a bandage on a structural water problem. You can repaint every two years or solve the drainage once. Those are your real options.
Check columns every spring. Catch new blisters before they spread into larger failures. Oil-based primer under topcoat extends the failure timeline enough that maintenance becomes occasional rather than a recurring spring project you dread.


Stay in the loop
Get the latest craftsman charm updates delivered to your inbox.