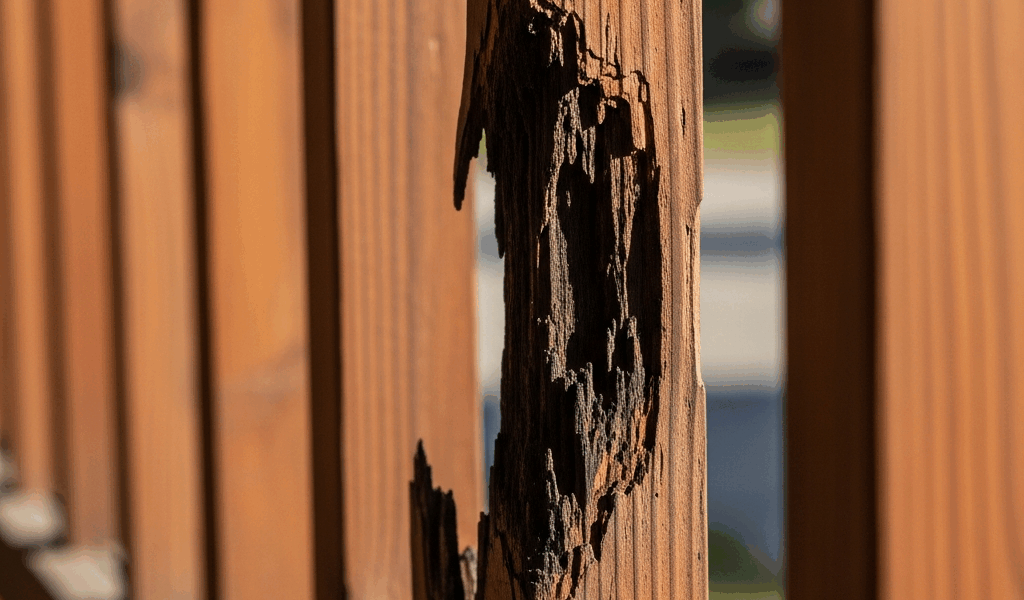
How Bad Is the Rot — And Where Exactly Is It
Craftsman porch repair has gotten complicated with all the conflicting advice flying around. So let me just tell you what I actually found on a Saturday morning last fall, poking around my 1920s bungalow with a flathead screwdriver — because that’s when everything became clear. Craftsman porch rail rotting at the post. Right where the horizontal rail meets the vertical support. Exactly where I should have looked first but somehow never do until things get ugly.
That joint is a moisture trap. Water pools there and doesn’t drain. Square Craftsman rails sit flush against the post, carving out a crevice that collects rain, morning dew, whatever the weather decides to throw. Rounded moldings shed water. Square profiles don’t. The wood absorbs it slowly, invisibly — then one day you lean on the rail and feel that soft, spongy give where solid grain used to be.
Grab a screwdriver or an awl and start poking the joint. Push hard. If the tool sinks more than a quarter-inch with almost zero resistance, that’s structural rot. Soft, spongy, density gone. Surface rot feels more like pushing into partially soggy cardboard — some resistance, maybe half an inch at most before it stops.
Probably should have opened with this section, honestly. Knowing what you’re actually repairing changes everything about the approach. Surface rot? Stabilize and fill it right there. Structural rot running deeper than an inch or two? That section of rail is compromised. It needs to come out.
Check the post cap while you’re at it. Years of water pooling in that joint leaves marks — a soft or mushroom-shaped cap edge is a serious sign of deep penetration. Then check the post itself. A solid post with a rotted rail sitting on top? Totally fixable with filler and paint. A post that’s soft right where the rail meets it? You’re in replacement territory now. Don’t make my mistake of patching over that situation twice before admitting what it actually was.
What You Need Before You Start
For a patch-and-preserve repair, the supply list is short — and cheap. One hardware store run.
- Wood consolidant — Minwax or Behr both work, around $15
- Two-part wood filler, exterior-rated ($12–18)
- Oil-based exterior primer ($20–25)
- 80-grit and 120-grit sandpaper
- Painter’s tape
- Small brush for consolidant, putty knife
- Plastic sheeting or drop cloth
That’s it. The consolidant hardens rotted wood fiber back into something workable. The filler bridges the void and matches the rail profile. The primer seals everything so moisture can’t sneak back in and restart the whole cycle from scratch.
While you won’t need a full lumber yard haul for a patch repair, you will need a handful of specific materials if you’re replacing an entire section. Craftsman rails typically run 4–5 inches wide, 1.5 inches thick, square-edged. Modern pressure-treated lumber works in a pinch, but clear cedar or redwood matches the original better — less clunky once painted. Budget somewhere around $40–80 for a 6-foot section depending on species and what your local yard is charging that week.
How to Stabilize and Fill a Rotted Rail Joint
Cleaned out with a wire brush and an old rag, the joint usually reveals more rot than you initially spotted. That’s normal. Don’t panic.
First, you should probe the entire rail joint — at least if you want to catch every weak spot before you commit to filling. Don’t just address the obvious soft area. Mark soft zones with a pencil. Sometimes rot runs 2 feet along the grain. Sometimes it’s a tight 4-inch pocket. Knowing the full picture stops you from missing a section that’ll fail six months later.
Next, prepare the surface. Scrape off loose, flaking paint. You’re not stripping the whole rail — just opening up the rotted area so consolidant can actually penetrate. Sand lightly with 80-grit where the wood is soft.
Now apply the wood consolidant. Brush it directly into the soft wood and saturate the grain. Let it soak in. Most consolidants cure in about 24 hours — check your specific product’s specs, though. Here’s something most guides skip entirely: drill small 1/8-inch pilot holes into the soft wood before brushing on the consolidant. Spaced roughly 2 inches apart across the soft zone, those holes let the liquid reach deeper into the grain. Makes a real difference in how solid the repair ends up feeling.
Then wait. I’m apparently impatient, and rushing this step is exactly where I went wrong on my first attempt. Tried filling while the wood was still slightly damp. The filler slumped right out of the joint within a month. Wet wood won’t accept filler. Consolidant needs to cure completely — no shortcuts here.
Mix your exterior wood filler according to the package directions. Overfill the joint by about a quarter-inch, pressing the filler deep into the gap with a putty knife, working it back and forth. Smooth it level with the surrounding rail surface. Most two-part fillers set in 2–3 hours but honestly benefit from overnight curing before you touch them with sandpaper.
Once fully cured, sand with 120-grit until the surface sits flush and smooth with the rail profile. Use a sanding block — freehand sanding tends to oversand one edge and leave a visible ridge. Feather the patch edges so it blends visually into the surrounding wood.
Then prime and paint. Non-negotiable. Bare wood filler absorbs moisture and fails — that’s just what it does. Two coats of oil-based exterior primer. Oil-based seals better than latex and won’t raise the grain the way water-based primers do. Let each coat dry according to manufacturer specs, typically 4 hours minimum. Follow with two coats of quality exterior paint. That’s what makes the repair last rather than just look fixed for a season.
When the Rail Section Has to Come Out
If your screwdriver sinks deeper than an inch, or the rot stretches more than 3 feet along the rail — stop patching. Replace the section.
Most Craftsman porches have rails spanning between corner posts and intermediate posts, typically 4–6 feet apart. You can pull one span without disturbing the whole railing system. Assess exactly what you’re removing before you start prying anything loose.
Remove the screws or nails holding the rail to the posts. Frustrated by fasteners that won’t budge, most people reach for brute force — don’t. Work a reciprocating saw or oscillating multi-tool blade between the rail and post to cut through stuck fasteners cleanly. Support the rail so it doesn’t drop and crack balusters below it. Wiggle it free, then measure the length, width, and depth before setting it aside.
Take that measurement — and a photo of the original profile — to a local lumber yard. Craftsman rails are square-edged and utilitarian. No fancy profiles. Many yards stock 4×6 or 5×6 cedar that works with minimal milling. Specialty suppliers online carry reproduction Craftsman molding profiles too, though shipping costs bite hard on lumber orders.
Cut replacement stock to length. Before installation, pre-prime all sides — top, bottom, and especially the back face that will sit against the post. That back-priming step stops moisture from creeping in from behind, which is exactly how the original rail failed in the first place. Fasten the new rail to the posts using galvanized or stainless screws, not nails. Screws hold through seasonal wood movement. Nails eventually loosen. This new approach took off among restoration folks several years ago and eventually evolved into the standard method enthusiasts know and swear by today.
Priming and Painting So the Rot Doesn’t Come Back
That rail-to-post joint will rot again if you don’t seal it. That’s the hard lesson — and the one most repair guides bury at the end where nobody reads it.
Two coats of oil-based primer after filling or replacing. Don’t skip it. Primer costs maybe $22. Replacing another rail section in 7 years costs time, money, and a whole weekend you didn’t plan to spend this way. Paint over the primed surface with exterior paint rated for porches — something built to handle weather exposure. Two topcoats minimum.
Pay close attention to that rail-to-post joint specifically. Once the paint is dry, run a bead of paintable caulk along the entire joint where rail meets post. Exterior-grade, 100% acrylic. Let it cure per product instructions — usually 24 hours — then paint over it. That caulk seals the crevice and stops water from pooling in the exact spot where the rot started.
X might be the best option, as this joint requires a flexible seal. That is because rigid materials crack with seasonal wood movement and open the gap right back up. Acrylic caulk moves with the wood. Re-caulk that joint every 2 years. It’s a 20-minute job — scrape out the old cracked caulk, apply fresh, let it cure, paint. That single habit is what separates a repair that holds from one that sends you back to the hardware store on another Saturday morning you had other plans for.


Stay in the loop
Get the latest craftsman charm updates delivered to your inbox.