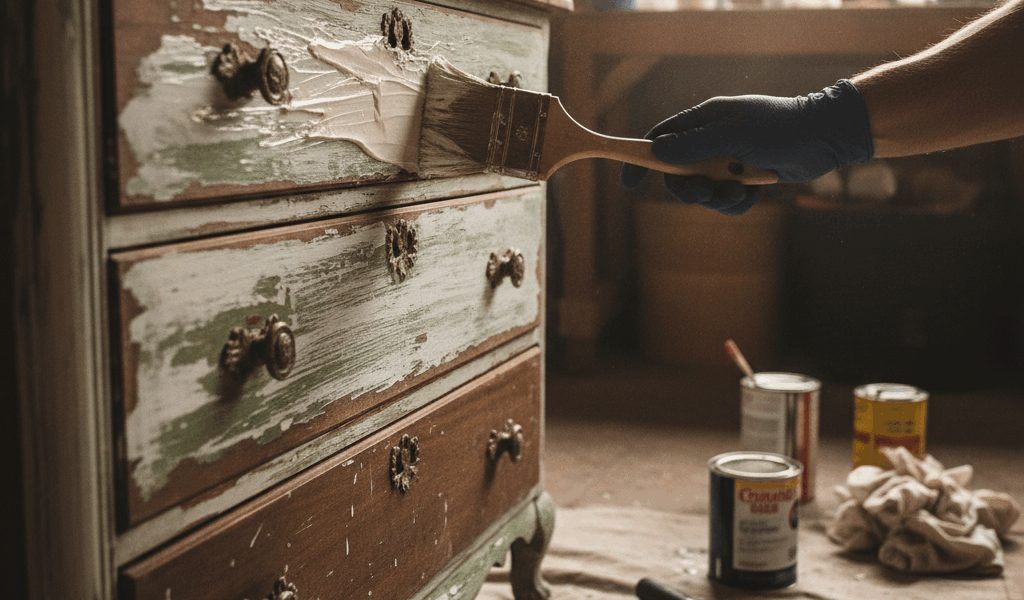
Stripping old finish from wood ranks among the least enjoyable parts of furniture refinishing. It’s messy, it smells, and it takes longer than you want. But choosing the right stripper for your project makes the difference between a frustrating weekend and a surprisingly satisfying one.
I’ve stripped finishes from dozens of pieces over the years—everything from family heirlooms caked in generations of paint to yard sale finds with factory lacquer. The product that works depends entirely on what you’re removing and what’s underneath.
Types of Paint Strippers
Methylene Chloride Strippers
The old industrial approach. Methylene chloride eats through paint and varnish faster than anything else available. Apply a thick coat, wait 15-30 minutes, and the finish wrinkles into a removable sludge.
The speed comes at a cost. This stuff is seriously toxic. You need genuine chemical-resistant gloves, safety glasses, and ideally respiratory protection. Work outdoors or in extremely well-ventilated spaces. The fumes make your head spin within minutes in enclosed areas.
Methylene chloride has faced increasing regulation—some countries have banned it for consumer use entirely, and EPA restrictions in the US have made it harder to find. If you locate it, understand why it requires respect.
NMP-Based Strippers (N-Methylpyrrolidone)
The generation that replaced methylene chloride in most consumer products. NMP works slower—expect hours instead of minutes—but without the acute toxicity. You still want gloves and ventilation, but you’re not risking immediate poisoning.
NMP strippers work best when you can leave them on long enough. I’ve had good results applying them in the evening, covering with plastic sheeting, and scraping in the morning. That extended contact time lets the chemicals penetrate multiple paint layers.
The downside is literally the wait time. If you’re stripping something small and straightforward, waiting overnight feels excessive. NMP makes sense for complicated pieces where chemical penetration matters more than speed.
Citrus and Soy-Based Strippers
The “safe” options that marketing pushes heavily. These use solvents derived from orange peels, soybeans, or other natural sources. They work, eventually. Expect contact times measured in many hours or even days for stubborn finishes.
I’ve found these strippers genuinely useful for certain applications. Delicate antiques where aggressive chemicals might damage the wood. Pieces with intricate carvings where you can apply stripper, cover with plastic, and let it sit while you work on other things. Indoor work when you can’t set up outside.
Don’t believe claims that these are entirely non-toxic. They’re less toxic than methylene chloride, but they’re still chemical solvents. Wear gloves. Provide ventilation. Read the safety sheets.
Heat Stripping
Not a chemical at all. Heat guns and infrared paint removers soften old finishes until you can scrape them off. This works exceptionally well for thick paint buildup on flat surfaces—old doors, window frames, architectural millwork.
Heat has limitations. It can scorch wood if you’re not careful. It doesn’t work well on curved surfaces or in tight crevices. And if you’re stripping lead paint, heat creates toxic fumes that chemical strippers don’t.
I use heat for rough removal on outdoor furniture and painted flat surfaces, then follow up with chemical stripper for whatever the heat missed. The combination is faster than either approach alone.
What I Actually Keep in the Shop
Three products cover most situations for me.
For fast work on thick finish or multiple paint layers: Citristrip. The orange gel version stays wet long enough to work without constant attention, smells acceptable, and strips reliably if I give it 8-12 hours under plastic wrap. It’s my default choice.
For stubborn finishes that resist everything else: Klean-Strip Premium Stripper, which is NMP-based. Slower than the old methylene chloride products but it eventually cuts through finishes that citrus-based strippers barely touch.
For delicate pieces where I’m worried about damage: Soy Gel. Takes forever, but the extended soak time means I can work on difficult areas without rushing and risking gouges. Good for carved details and veneer.
Application Tips That Actually Matter
Apply stripper thick. Thin coats dry before they penetrate. Think of spreading mayonnaise rather than painting. The layer should be substantial enough that it stays wet throughout the contact time.
Plastic wrap prevents evaporation and extends working time dramatically. After applying stripper, press plastic sheeting directly onto the surface. On complex pieces, I wrap entirely in plastic—arms, legs, all of it. This also lets you walk away without babysitting the project.
Neutralize after stripping. Most strippers require washing with mineral spirits or water depending on the formula. Skip this step and you’ll have adhesion problems with the new finish. Read the label—neutralization methods differ between products.
Test on an inconspicuous area first. Different finishes respond differently to different strippers. What works beautifully on one piece might damage another. The inside of a drawer or the underside of a table reveals how the stripper will interact with that specific wood and finish combination.
After Stripping
Chemical strippers raise wood grain. Plan on sanding after stripping—sometimes extensively. I usually start with 120 grit to remove any remaining residue, then work up to 220 for a smooth surface ready for new finish.
Old wood sometimes reveals surprises after stripping. Hidden repairs, mismatched patches, previous damage. The new finish will highlight these unless you address them. Stripping is often just the first step in a longer restoration process.
Give wood time to dry completely before applying new finish. Stripper residue and neutralizing solvents need to evaporate. A few days in a warm, dry space after sanding usually does it. Rushing to the finish stage causes adhesion problems that are much harder to fix than waiting would have been.


Stay in the loop
Get the latest wildlife research and conservation news delivered to your inbox.