Why Craftsman Trim Pulls Away in the First Place
Craftsman trim repair is one of those topics where the advice you find tends to be either too basic or flat-out wrong. I re-caulked the same trim joint on my 1925 cottage three times in two years, and what I learned along the way is worth sharing properly.
A trim separation problem is really a wood movement problem wearing a caulk failure costume. And there’s more depth to it than that simple definition suggests. Craftsman-era homes use wide, flat casing profiles — typically 3.5 to 5 inches across — that sit proud of the siding plane. Gorgeous design. Structurally vulnerable in ways a modern ranch trim profile simply isn’t.
That wide flat surface behaves like a board floating on the wall. Wood moves. A lot. Summer humidity swells the trim perpendicular to the grain. Winter dryness shrinks it back. The siding underneath — original shiplap or replacement fiber cement, doesn’t matter — does the exact same thing, just at a slightly different rate.
So the joint between them opens and closes like a breathing seam all year long. Add nails that are too shallow or clustered only at the top edge, and the trim physically lifts away rather than staying pinned tight. No back-priming on all four sides before installation means moisture wicks straight into the end grain — accelerating movement, inviting rot.
Most original Craftsman homes have zero backer rod in those joints. Just trim against siding, maybe some old glazing compound from 1952. When that crumbles, the gap widens past what any caulk bead can bridge without tearing itself apart. It’s the kind of thing that old-house people tend to understand instinctively — it’s never just one thing.
How to Tell If It Is a Caulk Failure or a Structural Problem
Before pulling out your caulk gun, figure out what you’re actually dealing with. The gap width is your first diagnostic tool — and it’s surprisingly reliable.
Gap under 1/8 inch with trim that feels completely solid when you push on it? That’s pure caulk failure. The joint is stable. Nothing structural happening. Gap at 1/4 inch or wider, though — measure it at three different points along the trim run. A variation of more than 1/16 inch between those measurements means the trim is actively moving or lifting. That changes everything about your repair approach.
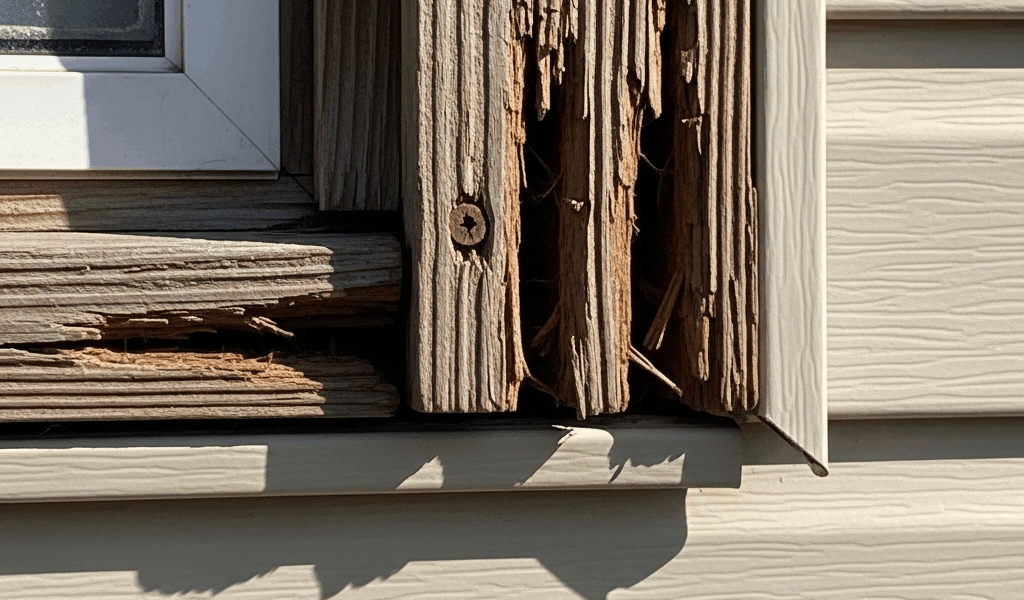
Press directly on the trim face near the gap. Even the slightest give means nails have backed out or were never set deep enough to matter. Run your hand along the backside of the trim if you can reach it from inside. Soft spots. Crusty, flaking paint. A spongy surface that compresses under your fingers. That’s rot. And rot means replacement, not repair — no amount of caulk fixes compromised wood.
Look at the caulk that’s already there. Peeling away cleanly from one surface? Adhesion failure — the caulk never bonded properly. Torn through the middle of the bead? The joint moved more than the caulk could flex. Both failures, but different root causes requiring different fixes.
Check the flashing above the trim. On Craftsman windows, flashing should overlap the back edge of the head casing. Rusted flashing, separated flashing, anything letting water pool behind that trim — no caulk job survives that. The flashing gets addressed first, or you’re wasting an afternoon.
What You Need Before You Start
This part deserves more attention than it usually gets. I’ve watched people caulk during a March cold snap and then curse the product when it never fully hardened. Temperature matters more than most guides admit.
Plan the work for spring or fall. Air temp needs to stay between 50°F and 85°F during application and for 24 hours after. Humidity below 80 percent. Miss that window and you’re not saving time — you’re scheduling a redo.
You probably don’t need a contractor’s truck full of gear, you will need a handful of specific materials. First, get a polyurethane caulk — at least if you want something that actually survives wood movement. Sikaflex 1A is the industry standard for this application. Bonds to painted wood, cures paintable, stays flexible through seasonal cycling. Runs about $8 to $12 per tube at most building supply stores. Some people use elastomeric acrylic, which works, but polyurethane might be the best option here, as trim repair requires a caulk that tolerates repeated joint movement. The reason is a Craftsman trim joint never fully stops breathing — it just slows down in mild weather.
I happen to be sensitive to cheap caulk guns and a $22 Newborn Bros. model works for me while the $3 plastic ones never feed consistently. Take it from me — get a rod-drive gun with a smooth-rod barrel and a built-in puncture tool.
For gaps wider than 3/8 inch, backer rod is non-negotiable. Not weatherstripping foam. Actual closed-cell backer rod in 3/8-inch or 1/2-inch diameter — it costs maybe $4 for 20 feet at a masonry supply. It keeps caulk from sinking to the back of the joint where it can’t adhere to both surfaces.
Also pull together: an oscillating multi-tool with a sanding attachment or a sharp pull scraper, a putty knife for tooling, exterior-grade paintable primer, and stainless ring-shank nails — 8d or 10d depending on your trim thickness. Galvanized works too. Regular smooth-shank steel nails are why half these repairs fail the first time.
Step-by-Step Repair for a Pulled Trim Joint
Step 1: Remove all old caulk. Every bit of it. Down to bare wood and bare siding surface. An oscillating tool with a 60-grit pad gets into the joint faster than a scraper alone. This step takes longer than the actual caulk application. Do it anyway. Old caulk tears new caulk apart as the joint moves — leaving even a thin layer behind is how you end up repeating this job next fall.
Step 2: Clean and dry the joint completely. Vacuum out all dust and wood debris. Wipe down with a dry cloth. Any visible moisture means you wait another day — or run a heat gun on low along the joint for a few minutes, keeping it moving so you don’t scorch the wood. The joint has to be bone dry before caulk goes anywhere near it.
Step 3: Check and re-nail the trim. If the trim is lifting or has any give, drive stainless ring-shank nails perpendicular to the siding surface every 12 inches along the full trim run. You’re nailing through the trim face into the structural sheathing or blocking behind it — not into the siding. The goal is pinning the trim down against the wall. That’s a different mechanical action than most people picture.
Step 4: Install backer rod. For gaps wider than 3/8 inch, press the backer rod into the joint with a putty knife. It should sit roughly centered in the depth of the gap — not flush to the surface. This keeps the caulk from sinking all the way through to the backside where it bonds to nothing useful.
Step 5: Apply caulk. Cut the tube tip at a 45-degree angle sized to match the joint width. One continuous pass along the joint, pushing the gun trigger with steady pressure. Overfill slightly — you’ll work it back in the next step. Stopping and starting mid-run leaves voids.
Step 6: Tool the joint. Wet your putty knife with plain water and draw it along the bead in a single smooth stroke. This presses caulk into the joint faces and leaves a slightly concave profile that sheds water better than a proud bead. Wipe the knife clean between passes.
Step 7: Prime and paint. Full cure time before paint — check the tube, but plan on 24 hours minimum and 48 if temps are below 60°F. Prime the caulked joint and a few inches of surrounding trim with a quality exterior primer. Then paint to match the rest of the house.
How to Stop It From Happening Again
If you end up replacing trim sections rather than repairing in place, back-prime all four sides of the new boards before they go up. Front face, back face, both edges. Quality exterior primer, fully dry before installation. That seals the end grain and cuts moisture wicking dramatically — which is the original condition that set this whole cycle in motion.
Stainless ring-shank nails, every 12 inches, on every flat casing section. They don’t rust out. The ring shanks grip as wood moves instead of loosening. This is not an area to substitute smooth-shank galvanized because they were on sale.
Walk the perimeter of your Craftsman home every fall — late October works well before temperatures drop too far to caulk. Look at trim joints. Small gaps now take 20 minutes to address. Wide separations with rot behind them take a weekend and a lumber run. The math is obvious.
That said: if rot has reached the window frame itself, if gaps won’t close even after renailing, or if water damage has compromised the underlying sheathing — caulk won’t save it. This new idea of “repair vs. replace” took off several years ago in the preservation community and eventually evolved into the framework that restoration enthusiasts know and rely on today. Sometimes full trim replacement is simply the honest answer, and recognizing that early saves a lot of effort spent on repairs that were never going to hold.


Stay in the loop
Get the latest craftsman charm updates delivered to your inbox.