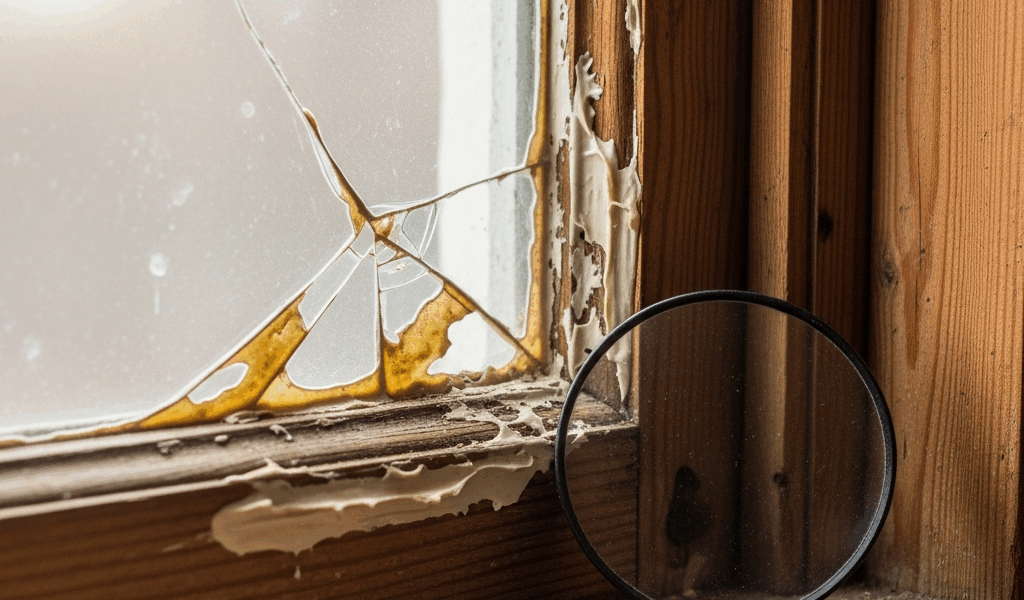
What Failing Glazing Actually Looks Like
Craftsman window glazing has gotten complicated with all the conflicting advice flying around. As someone who has spent more weekends than I care to count hunched over old sash windows with a putty knife, I learned everything there is to know about diagnosing the stuff. Today, I will share it all with you.
But what is glazing failure, exactly? In essence, it’s your window compound breaking down and losing its ability to seal glass to wood. But it’s much more than that — it’s a four-stage process, and which stage you’re in determines everything about what you do next.
Hairline cracking comes first. Fine spider-web patterns running through the compound, usually radiating outward from the glass edge. Run your fingernail across the surface. Shallow crack, putty still feels hard? You caught it early. These don’t let in much water. You’ve got years before it gets serious.
Full separation is the next stage — and uglier. The glazing pulls completely away from the glass. You can slide your thumbnail into the gap. Sometimes your whole fingernail fits. Water runs straight behind the compound when that happens, and you’ll hear the glass rattle on windy days because the tension-holding putty is simply gone. That’s usually when people finally call someone.
Missing chunks are exactly what they sound like. Pieces have fallen out. The wood rabbet underneath sits exposed. Moisture is actively getting into the sash now. Rot becomes your real concern at this point — not the glazing itself.
Last is what I call the chalk stage. The compound has oxidized so completely it looks almost gray, crumbles when you press it, feels dusty. Usually means the putty is 40-plus years old and the oils have long since evaporated. It may still hold the glass — barely — but it won’t keep water out. Not a chance.
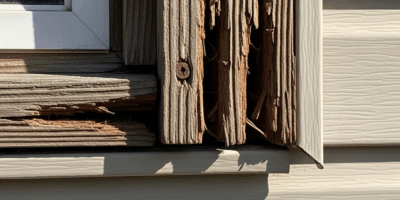
Check for Rot Before You Do Anything Else
Probably should have opened with this section, honestly. I once spent three hours reglazing a sash only to discover soft wood in the sill about six months later. Three hours. Gone. Don’t make my mistake.
Grab a flat-head screwdriver or a metal awl — something with a firm tip. Press it against the wood in the rabbet, which is the groove holding the glass, and along the sash edges. Good wood pushes back. It feels like poking a hardwood floor. The tool barely sinks in.
Soft or spongy wood is your stop sign. Tool sinking more than 1/8 inch under moderate pressure means rot has started. The glazing failure you’re staring at might be a symptom, not the actual problem. Putting fresh putty over rotted wood is roughly equivalent to patching drywall over an active leak — the real issue keeps spreading underneath.
Small soft spots, quarter-sized or smaller, can sometimes be stabilized with epoxy wood filler. It’s not ideal, but it works in a pinch. Larger areas? You’re looking at sash replacement or professional wood repair. Check the muntins carefully — those are the horizontal and vertical pieces between panes. They trap water and rot before anything else does.
Firm wood everywhere? Good. You’ve got a glazing-only repair ahead of you. So, without further ado, let’s dive in.
Why Craftsman Window Glazing Fails So Often
Most Craftsman homes are sitting on glazing that’s 80-plus years old. The original compound was linseed-oil based — fine stuff, actually, but it hardens over decades as the oils oxidize and evaporate. After about 40 years, the oil is essentially gone. The putty goes brittle and cracks under seasonal wood movement. That’s what makes the material such a challenge for Craftsman owners specifically.
There’s another wrinkle. Many of these windows were painted with oil paint directly over raw compound, no primer. That paint seal stopped the putty from skinning properly — surface hardened while solvents stayed trapped inside. Weakened the whole mass from within.
South and west-facing windows fail faster. Constant sun accelerates oxidation. I’m apparently living proof of this — my north-facing dining room windows are fine while the southwest bedroom windows never seemed to hold glazing for more than a decade. Same house. Same original putty. Completely different results.
Most Craftsman owners also miss the maintenance window. Glazing isn’t like a roof you can ignore for 50 years. Small cracks need attention every 15 to 20 years. A touch-up costs almost nothing. Waiting until chunks are falling out? That’s a full reglaze job. Different afternoon entirely.
How to Reglaze a Craftsman Window Sash Step by Step
Step 1: Remove the old glazing. Two methods worth knowing. A heat gun softens old putty in 30 to 60 seconds — scrapes away cleanly after that. A chemical softener like Sarco Glazing Compound Remover works slower but produces less dust and no fumes. Heat gun wins on a single window. Chemical softener is smarter if you’re running through six sashes and don’t want to be breathing all day.
Step 2: Clean the rabbet. Scrape it clean once the old putty is out. Sand lightly with 80-grit paper. You want a smooth, bare surface — debris and old paint flakes will telegraph right through your new compound.
Step 3: Prime and oil the wood. Stripped down to bare wood? Apply one thin coat of linseed oil to the rabbet. This stops the wood from pulling all the oil out of your new glazing compound, which would cause it to dry too fast and crack prematurely.
Step 4: Bed the glass if needed. If the glass moves when you touch it, apply a thin rope of compound around the back side of the rabbet first, then press the glass firmly into place. This gives the glass proper support from behind.
Step 5: Apply new glazing compound. Roll a rope of compound about 3/8 inch thick. Press it into the rabbet on the exposed outside face. Here’s where the product choice matters — DAP 33 is mineral-oil based and sets faster, typically around $6 to $8 a tub. Sarco linseed-oil putty stays workable longer but needs more cure time. They’re not interchangeable. Pick based on how many windows you’re doing and how patient you are.
Step 6: Tool the putty. Hold a putty knife at 45 degrees and smooth the compound into an angled edge running from glass to sash wood. That angle is what sheds water. Work in smooth strokes. Wipe the knife clean between passes — fresh blade, clean line.
Step 7: Let it cure. Linseed-oil putty needs 7 to 14 days before painting. DAP 33 needs 3 to 5 days. The putty skins over during this window while internal solvents finish evaporating. Paint too early and you seal the surface before that process completes. That is because trapped solvents keep the putty soft underneath — and soft putty fails fast.
The One Mistake That Sends You Back to Square One
Painting over uncured glazing. It wrecks an estimated 80% of DIY reglaze jobs within the first year — and it’s entirely avoidable.
Paint acts as a vapor barrier. It seals the surface before the putty has properly skinned, before internal solvents have finished their work. Those trapped solvents keep the compound soft underneath. Wind pressure, thermal stress — eventually the paint cracks. Water gets in. The whole repair fails.
Wait the full cure time. Mark your calendar with a Sharpie on the day you finish. Thirteen days minimum. I know it feels like forever when you’ve just put in a Saturday afternoon on this. Resist it anyway.
After that: check your glazing every spring. Look specifically for hairline cracks. Find any? Lightly sand the area and brush on thin linseed oil. Five minutes. Costs almost nothing. Prevents hairline cracks from becoming full separations.
Craftsman windows were built to last well over a century. The glazing is the one component that asks something of you in return — attention every couple of decades, maybe one real afternoon of work. That’s what makes caring for these windows endearing to us Craftsman owners. It’s a reasonable trade.

Stay in the loop
Get the latest craftsman charm updates delivered to your inbox.