How Rot Starts in Craftsman Porch Columns
Craftsman column restoration has gotten complicated with all the conflicting advice flying around. As someone who has spent the better part of two decades restoring these homes across the Midwest, I learned everything there is to know about rot at the base of those beautiful tapered porch columns. Today, I will share it all with you.
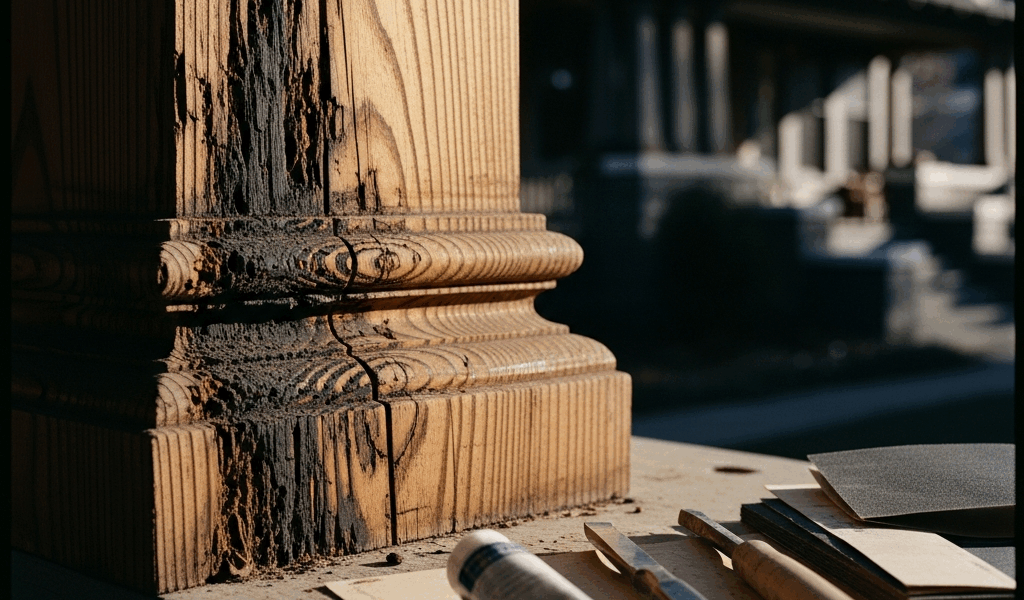
The irony is genuinely crushing — the very thing that makes these columns architecturally stunning is often what kills them first. Wood meets concrete. Sounds harmless. But concrete wicks moisture upward like a lamp wick, and that moisture migrates into the column base year after year, winter after winter. Wood fiber expands. Contracts. Paint cracks. More water intrudes. Now you’ve handed fungi and wood-destroying organisms a perfect home.
But what is the specific vulnerability in Craftsman tapered columns? In essence, it’s the grain angle near the base. But it’s much more than that. The taper forces grain to run at angles, which creates micro-valleys where water pools. Even “protected” bases collect moisture in the transition zone — usually somewhere between 6 and 18 inches up from the concrete.
Probably should have opened with this section, honestly. I learned it the expensive way on my third restoration. I figured regular paint every few years would handle it. Spoiler: it doesn’t. The base of a 1920s column I was working on had soft spots completely invisible to the touch. I only caught them probing with a screwdriver. Rot already a quarter-inch deep, hiding under perfectly intact paint.
It compounds further if your porch has settled — and many Craftsman homes have, especially on clay soil. Settlement creates a tilt that concentrates drainage toward one side of the column base. I’ve pulled columns where roughly 80 percent of the rot lived on the west-facing side alone. Forty years of water shedding in exactly the same direction. Don’t make my mistake.
Assess the Damage — Repair vs. Replace
Before you panic and budget somewhere between $500 and $1,200 per column for replacement, figure out whether you’re actually in repair territory or replacement territory. That distinction matters financially — and philosophically, if preservation means anything to you.
Get a screwdriver. A standard 1/4-inch flat-head works fine. I’m apparently a vintage-tool person, and an old Stanley I inherited works for me while newer plastic-handled versions never feel right in my hand — but any decent screwdriver does the job. Press it firmly into the suspect area at the column base. If the wood resists and the tip doesn’t sink past 1/8 inch, you’re likely dealing with cosmetic surface checks, not structural rot.
If it sinks half an inch or more, you have rot. Full stop.
Probe vertically upward from the base in one-inch increments. On most repairable columns, deterioration stays confined to the bottom 6 to 12 inches. Soft wood extending past 18 inches — or rot that’s reached the actual taper transition zone — means replacement is the smarter call. The taper is what makes the column look right. Destroy that profile, and you’ve lost the column regardless of what lumber you use to patch it.
I picked up a useful technique from a restoration carpenter in Madison. Tap a large screwdriver or old chisel gently upward in one-inch steps. You’ll feel a distinct shift in resistance when you cross from rotted wood into sound wood. Mark that point with a pencil. That’s your cut line — and everything below it needs to go.
If that line falls below 18 inches from the concrete, repair is not only viable, it’s honestly preferable. You preserve the original column, maintain authenticity, and spend roughly one-third the cost of full replacement. That’s what makes original Craftsman material endearing to us preservationists.
How to Repair a Rotted Craftsman Column Base
This isn’t a solo afternoon project. Budget two to three days. Recruit someone to help you manage the temporary support phase — the work goes sideways fast when you’re alone and a beam shifts unexpectedly.
Supporting the Load
Your column carries dead load from the roof structure above plus live load — snow accumulation, people on the porch. Most Craftsman porches distribute this across four to six columns, so each one carries roughly 4,000 to 6,000 pounds depending on roof pitch and span. That weight has to go somewhere while you’re cutting out the base.
A hydraulic bottle jack rated for at least 6 tons is what you need here. I use a Torin T90603, cost me about $45, and it’s held up through 50-plus projects without complaint. Position it directly under a beam or joist the column supports — not under the column itself. You’re transferring load to temporary support, not adding pressure to compromised wood.
Place the jack on a stable surface. A 2×10 board underneath distributes pressure and keeps it from punching through porch decking. Raise it slowly until you feel slight resistance — tension, not aggressive lift. Too much too fast buckles wallboard, cracks plaster, and stresses the whole assembly. Ask me how I know.
Once the jack bears modest load, set up adjustable steel shores alongside it. These run about $30 each at most tool rental shops and last indefinitely. Crank them up until they’re sharing weight with the jack still in place. Redundant support. Only then drop the jack slightly — leave it in position as backup. Both supports stay until the splice block is fully fastened and cured.
Cutting the Rot
Mark your cut line clearly with chalk. Use a circular saw or reciprocating saw to cut horizontally through the column. Precision here is non-negotiable — an off-square cut means your splice block sits at an angle, which means gaps, which means water intrusion, which means you’re doing this again in ten years.
Check the cut with a level. Seriously. Thirty seconds. A 2-degree angle is invisible to the naked eye and creates visible gaps when you try to seat the new base. I’ve skipped this step exactly once. Never again.
Remove the rotted section. What remains is a column resting on a flat, freshly cut surface. Honestly, that moment always feels satisfying — you’ve physically removed the problem.
Crafting the New Base
Your splice block should match the column width and extend down to the concrete. For a tapered Craftsman column, that typically means a block roughly 5 to 8 inches wide at the bottom, tapering upward to match the column’s cross-section at the cut line.
Cedar is the period-correct choice — rot-resistant, machines cleanly, and looks authentic. I sourced a 5×8 clear heart cedar block from Woodcraft for $28 on my last project. Mahogany is another option and offers maximum durability, though it’s pricier and less common in original Craftsman construction.
While you won’t need exotic tropical hardwoods for most repairs, you will need a handful of quality materials. Pressure-treated lumber is a practical compromise if budget is tight or the location is especially exposed. Not historically accurate — but a PT 4×8 block runs about $12 and will genuinely outlast everything around it.
Whatever species you choose, cut it square and true. The top face must match your column’s bottom exactly. A table saw jig becomes invaluable here — build a simple angled jig matching your column’s taper, typically 1.5 to 3 degrees depending on the design. Run the splice block through this jig to cut the angled mating surface.
The block should fit snugly between column bottom and concrete with no daylight visible at the seams. If you see gaps, shim them with cedar shims or pressure-sensitive epoxy putty. Water finds every opening. Seal aggressively.
Fastening and Finishing
Lag bolts hold the splice. I use 3/8-inch hot-dipped galvanized lags — four of them in a square pattern, two threading into the column above and two sinking into the splice block below. Drill pilot holes first. Wood splits when you drive lags blind, and a split splice block at installation is a genuinely demoralizing experience.
Sand the joint smooth once the splice is secured. You want the visual transition from old column to new base to nearly disappear. A random orbital sander with 120-grit paper handles this in about 20 minutes per column. Worth every minute.
Paint comes last. Prime everything with a quality exterior primer — Benjamin Moore’s Fresh Start runs about $35 a gallon and adheres to practically anything. Follow with two finish coats. Match the existing column paint as closely as possible. Most Craftsman homes used muted earth tones or off-whites. Not bright white. Bright white reads wrong on these houses.
Prevent Future Rot with a Proper Post Base
Your repair will fail if you don’t address the actual problem: moisture wicking up from concrete. So, without further ado, let’s dive in.
Install a metal post base plate. This is a simple L-shaped flashing — galvanized or stainless steel — that sits between column base and concrete and creates a capillary break. Simpson Strong-Tie makes a standard version for about $8 that bolts to both column and concrete. Bolt it. Don’t nail it. Nails rust, then pull, then you’re back to square one.
Above the post base, wrap the lower 18 inches of the column — new splice plus original wood — with copper flashing tape. Overlap seams by 2 inches. A 50-foot roll runs about $35 and covers roughly six feet per column, so you’ll have material left over for the next one. Copper ages beautifully and lasts indefinitely. That’s what makes it endearing to us preservation types — it’s a one-time fix that actually holds.
Leave a small air gap between column and post base — 1/8 inch is enough — so water drains away rather than puddles. Pitch the concrete porch deck away from the column base at minimum 1/4-inch drop per foot. Check this with a level before you call the job done.
Paint maintenance matters more than people admit. Inspect columns every two years. Look for paint cracks near the base. Recoat compromised areas. A gallon of exterior paint costs $30 to $40. A failed column repair costs ten times that — at minimum.
Period-Correct Materials for Craftsman Columns
Authenticity and durability don’t always align. With Craftsman restoration, they usually do.
Original columns came from clear heart cedar, Douglas fir, or mahogany. These species were chosen because they resist rot naturally and machine beautifully. Cedar and Douglas fir grain patterns age gracefully, silvering under weathering in a way that actually suits the original aesthetic rather than fighting it.
If you’re splicing a base, match the species. A tapered cedar column paired with a mahogany splice looks wrong even when dimensions are perfect. Walk your neighborhood’s Craftsman blocks and look at original column bases. You’ll see what builders reached for in 1915. That’s your answer.
Pressure-treated lumber is the practical option when longevity trumps historical accuracy. It’s chemically preserved against rot and insects, inexpensive, and widely available. The downsides are real though — PT wood is heavy with treatment moisture, sometimes bleeds tannins through paint, and simply doesn’t weather the way original materials do. The grain never quite looks right.
For maximum modern durability, ipe or cumaru — dense tropical hardwoods — are virtually immune to rot. They run $200-plus per board foot, so this is a genuine splurge. I used cumaru on a major restoration in 2019. Four years later, zero deterioration. If you’re doing this once and never again, it might be worth the cost. Probably should have mentioned the price first, honestly.
Whatever material you land on, seal it before installation. Two coats of exterior primer plus two finish coats create a protective envelope around the wood. Budget an extra week for full cure before the column sees rain.
I’ve inspected columns I repaired 15 years ago. They look like the day I finished them. That’s not luck — it’s the right materials, careful detail work, and a moisture barrier that actually functions. Do it right once, and the repair outlasts you.


Stay in the loop
Get the latest craftsman charm updates delivered to your inbox.