Why Craftsman Trim Is Especially Prone to This
Craftsman exterior paint peeling has gotten complicated with all the bad advice flying around. As someone who stood in front of my 1924 bungalow’s crumbling trim for three hours — cold coffee in hand, genuinely baffled — I learned everything there is to know about why this keeps happening. Today, I will share it all with you.
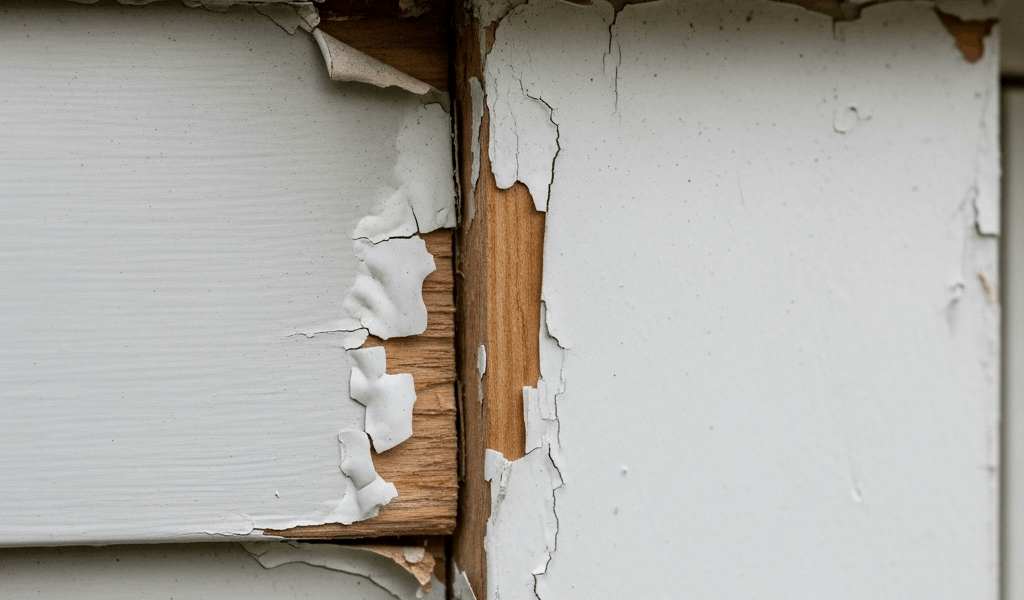
But what is a Craftsman trim failure, really? In essence, it’s a geometry problem wearing a paint problem’s disguise. But it’s much more than that. These homes feature those wide, flat trim bands — typically 6 to 12 inches across — that frame windows, doors, and eaves. Gorgeous. Also: horizontal water collectors. The flat surfaces create what builders call shadow lines, recessed joints where trim meets siding. Water pools. Doesn’t dry fast. Migrates into the wood, gets behind the paint, and the whole thing starts over.
Add the eave situation. Deep overhangs look protective. They’re actually moisture traps. Rain blows in sideways during storms — the trim gets soaked, the siding gets soaked, but that flat trim profile holds water against its surface longer than the adjacent siding ever would.
Then there’s the paint history problem. Most pre-1978 Craftsman homes carry original oil-based primers underneath. Some have lead paint. Modern latex applied over that incompatible base fails at the molecular level — no adhesion, moisture sneaks in at the boundary, paint bubbles, peels, you scrape, repaint. Two years later: identical problem. That’s what makes this cycle so endlessly frustrating to homeowners who genuinely tried to do it right.
Probably should have opened with this section, honestly. Understanding the actual cause stops the loop before it starts.
Find the Real Cause Before You Touch a Scraper
So, without further ado, let’s dive in — starting with diagnosis, because skipping this step is exactly how you end up doing this again in 18 months.
Tape a piece of clear plastic sheeting directly over the peeling area using painter’s tape. Airtight seal. Wait 24 hours. Condensation under the plastic means active moisture coming from inside the wood or the wall cavity — that’s Problem One. Plastic stays dry but paint still peels? Adhesion failure from incompatible primer layers — that’s Problem Two. Simple test. Changes everything about the fix.
A moisture meter gives you real numbers rather than guesswork. Professional-grade models run $30 to $100 — the Calculated Industries 7440 sits around $45 and works well. Wood should register around 12–15% moisture content. Anything above 18% means water is actively saturating the material. Paint won’t stick at that point. Doesn’t matter how careful your technique is.
Failing caulk is usually where the moisture trail leads. Look closely at the trim-to-siding joint. Cracked, missing, pulling away — water gets in. Fix the caulk before repainting. Not after. Don’t make my mistake — I painted over compromised caulk once and watched the whole section bubble again within a season.
Adhesion failure looks different. Paint lifts in sheets, usually starting at edges or wherever old paint was already soft. That’s latex sitting on top of an oil primer that lost its grip on the wood years ago. Paint is the symptom. Moisture and primer incompatibility are the actual disease.
How to Prep the Trim Without Damaging the Wood
While you won’t need industrial equipment, you will need a handful of specific tools — and the patience to use them correctly on soft fir.
First, you should test for lead paint — at least if your home was built before 1978. A $15 kit from any hardware store. Lead requires containment: plastic sheeting, HEPA vacuums, wet methods. Not optional. Not alarmist. Just responsible.
For lead-free trim, a heat gun outperforms chemical strippers. Set it to 500–600°F, hold it about 6 inches from the surface, keep it moving. Paint softens without smoking. Use a plastic scraper — metal gouges soft fir almost immediately. Scrape at a shallow angle, maybe 20 degrees from the surface. That’s the detail most people skip.
Sand after scraping. Start with 80-grit to knock down rough edges and residual paint. Finish with 120 or 150-grit to feather where old paint meets bare wood — this creates a slope rather than a hard edge, so primer flows smoothly across the transition instead of bridging a cliff.
Bare wood is ideal but not always required. Sound, smooth wood under old latex? Stop there. Oil paint underneath, or rough surface? Get to bare wood. Takes longer. The difference is a repair lasting 3 years versus one lasting 10. Easy math.
Prime Right or You Will Do This Again in Two Years
I’m apparently sensitive to primer failures and Zinsser BIN works for me while standard acrylic latex never does — at least not on old Craftsman trim. BIN is shellac-based. Bonds to old oil paint and bare wood equally well. About $25 per quart at most hardware stores. Worth every cent.
Kilz Cover Stain is the other option — alcohol-based, similar performance, slightly easier to find in smaller quantities. Either one works. A 100% acrylic latex primer will not. It won’t grab old oil-based paint underneath, water finds the boundary, peeling returns. That’s the cycle everyone is trying to escape.
Apply primer thick enough to fully cover the wood without drips. Two coats for bare wood or previously oil-painted trim — standard practice, not overkill. Dries in 30 minutes to an hour depending on humidity. If you removed any trim to work behind it, back-prime before reinstalling. Paint the back side and edges. Exposed wood edges wick moisture fast. Sealing them first closes that pathway entirely.
Caulking and Topcoat Tips That Actually Hold
The caulk joint matters more than the paint color. That is not an exaggeration.
Paintable polyurethane caulk — not standard acrylic latex. Sikaflex 1A or OSI QUAD run $8 to $12 per cartridge. They stretch with wood movement and stay flexible for years. Acrylic latex caulk hardens and cracks within 3 to 5 years, especially in sun-exposed spots where Craftsman trim lives permanently. Don’t make my mistake and grab whatever’s cheapest at the register.
Apply a consistent bead about 3/8 inch wide along the entire trim-to-siding joint. Tool it immediately with a wet finger or a caulking tool — presses it into the gap, creates a concave shape that sheds water instead of trapping it. That shape is doing real work.
For topcoat, 100% acrylic exterior paint in satin sheen. Satin outperforms flat — which shows dirt immediately — and semi-gloss, which traps moisture more easily and looks wrong on Craftsman homes. Benjamin Moore Aura and Sherwin-Williams Emerald both run $50 to $65 per gallon. Two coats. They last.
Timing matters more than most people expect. Paint feels dry in 4 to 6 hours. It isn’t actually cured for 28 days. Keep hard rain and sprinkler water off it for at least 48 hours. Most peeling at the caulk joint traces directly back to water hitting uncured paint. Get this right once and the whole frustrating cycle stops. That’s what makes understanding the process worth the extra thought upfront.


Stay in the loop
Get the latest craftsman charm updates delivered to your inbox.