Figure Out Which Gap You Actually Have
Craftsman door casing repairs have gotten complicated with all the bad advice flying around. Most people grab caulk immediately — at least if they’re going by instinct — and that solves exactly nothing. It shrinks, it cracks, and honestly it ends up looking worse than the original gap did.
There are two distinct gap types here, and which one you’re dealing with changes everything.
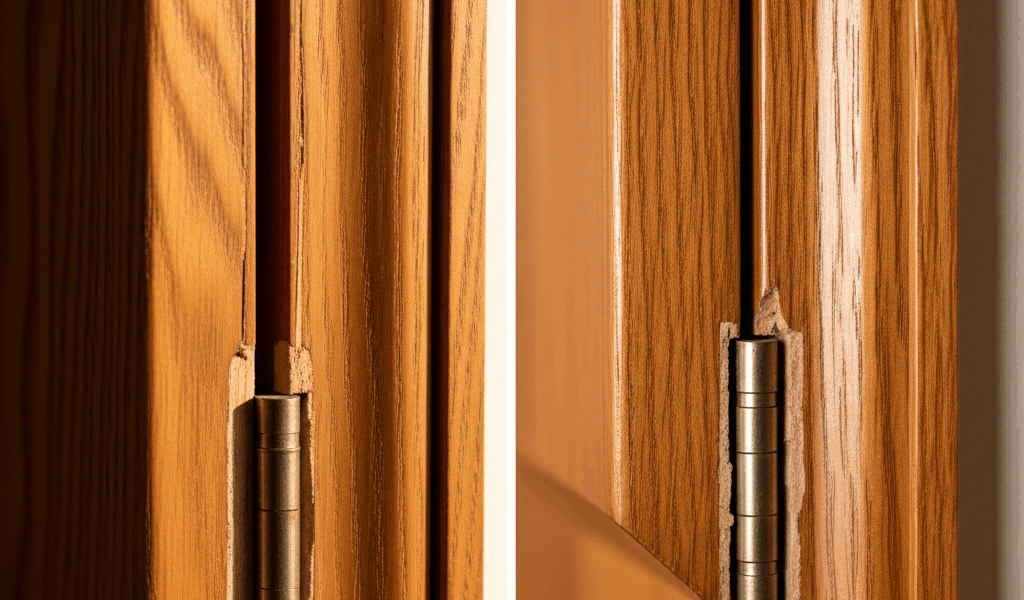
The first: a gap between the casing and the wall surface. Stand in front of your door right now. Look along the edge where the trim meets the drywall or plaster. Slide a playing card in there. If it fits, you’ve got a wall gap — running horizontally across the top casing or vertically down the sides. That means the casing has pulled away from the wall, the wall has moved, or both happened at once.
The second type is an open miter joint. But what is a miter gap, exactly? In essence, it’s where two casing pieces meet at a corner and no longer sit flush. But it’s much more than that — it’s a mechanical failure that just looks cosmetic. Check the actual corner, not the wall interface. You’ll see a visible line where the two mitered cuts have separated. Sometimes it’s a hairline. Sometimes it’s a quarter-inch crack with light coming through.
Why does the distinction matter? A wall gap needs the casing pulled back tight and properly secured. A miter gap needs recutting, gluing and clamping, or a flexible filler sanded smooth. Opposite problems. Opposite treatments. Don’t make my mistake of treating them the same way — I spent an entire Saturday afternoon fixing a repair I’d already done wrong once.
Why Craftsman Casing Makes This Harder Than It Looks
Authentic Craftsman casing has a flat, wide profile. No curves, no ornament. Just clean lines and honest wood — usually quarter-sawn oak or fir, finished specifically to show the grain. That’s what makes Craftsman trim endearing to us renovation enthusiasts. It looks elegant when tight. It looks genuinely broken when it isn’t.
A colonial or ogee profile has shadow lines and built-in dimension. A gap in ornamental trim reads as part of the design. Craftsman trim reads as failure. The flat surface has nowhere to hide a half-millimeter inconsistency. None.
Probably should have opened with this section, honestly. There’s also the reveal — that intentional gap between the casing and the door jamb edge, usually sitting right around a quarter-inch. New homeowners confuse this with a defect constantly. You want that reveal. It belongs there. A wall gap is different. It shows up on the outside edge where casing meets drywall, not at the jamb side.
Fixing a Gap Between the Casing and the Wall
This is where diagnosis saves you hours of wasted work. So, without further ado, let’s dive in.
First, you should figure out what actually moved — at least if you want to avoid repairing the same gap in six months. Run your hand along the casing. Press gently. Does it flex at all? Soft casing that gives way means a nailing problem. It’s not anchored to the framing. Rock-solid casing means the wall shifted. Older houses do this constantly — seasonal expansion, foundation settling, old plaster shrinking. Pick any of those.
Nailing problem? You need to renail. Use 2-inch finish nails — 16 gauge, galvanized or stainless if this is anywhere near moisture. I’m apparently hard on bathroom hardware and Tremont stainless works for me while cheap steel nails never last. I used standard steel nails on a bathroom door once. They rusted, they popped, and I was back to square one by spring. Space nails 12 inches apart, staggered to hit studs and the header. Pre-drill to avoid splitting the casing — especially on older fir. Tap each nail in at a slight angle rather than perpendicular, so it pulls the trim back into the wall as it sets.
If the wall itself moved and the casing is otherwise fine, you’ve got a choice. Paintable flexible caulk works — something like DAP FastN Final or OSI QUAD MAX — but only when the casing is still in decent shape overall. Avoid silicone on wood trim. It doesn’t sand, it doesn’t accept paint well, and it looks aggressively plastic against Craftsman details.
Before touching caulk, check whether the drywall is proud — sticking out past the back edge of the casing. This happens constantly in renovation work. If it is, you can score and break off that high drywall edge, or back-cut the casing with a utility knife so it seats fully. Back-cutting is faster. Place the blade at a low angle against the back inside edge of the casing and shave off a thin bevel. One or two passes usually does it. The casing sits flat again.
Here’s the mistake I made early on: I slathered caulk into a wall gap on a Craftsman mantel because I wanted it seamless. It was not seamless. It looked like someone smeared white toothpaste on mahogany. On a flat profile, excess caulk telegraphs immediately — there’s no shadow line to absorb it. Use a caulk gun with a thin bead, quarter-inch at most, and tool it with a wet finger. Less is always better with this style. The wood should still dominate the visual.
Fixing an Open Miter Joint on Craftsman Door Trim
A miter gap under a sixteenth of an inch might close on its own if you improve the nailing elsewhere. Probably. Don’t count on it, though.
Visible, consistent gap? You recut or you glue. Recutting is the honest fix — pull the casing down, adjust your miter saw angle, make a fresh cut. This works well if you’re off by a full degree or two. You lose maybe an eighth of an inch of length total, and if the casing runs into a wall or baseboard, you’ve got fudge room there.
Want to keep it hung instead? Titebond III might be the best option here, as miter repair requires real movement tolerance. That is because exterior-grade wood glue handles seasonal expansion and contraction better than standard wood glue — the joint won’t re-crack when humidity swings in January. Apply it sparingly to both miter surfaces, clamp the joint for two hours minimum, then drive a 23-gauge pin from one face and another from the opposite face. Two pins per miter, angled so they cross each other internally. That locks the joint mechanically, not just with adhesive.
On stained wood, do not use caulk at a miter. Period. It shrinks, it yellows, and it reads as a patch job on any finish-forward surface. The glue line will be nearly invisible once dry. Sand the miter flush if needed — 120-grit, light pressure — and trust the wood itself to carry the repair.
On painted trim, a flexible paintable filler works when the gap runs larger. Push it in with a putty knife, let it cure fully, sand flush, paint. That said, the joint is still mechanically weak afterward. Gluing and pinning is stronger. Always.
Keeping It From Happening Again
As someone who has repaired the same Craftsman doorway twice in three years, I learned everything there is to know about preventing this the expensive way. Today, I will share it all with you.
Acclimate wood casing to the room’s humidity before installation. Lean it against the wall for a week — longer in climates with dramatic seasonal swings. Prime all four sides before nailing: top, bottom, both edges. That seals the wood and stabilizes it against moisture absorption. Use 8d or 10d finish nails driven into actual framing, not just into drywall.
Seasonal movement is normal. In older homes with wood framing and no air conditioning, Craftsman trim expands and contracts a quarter-inch or more across a full year. Gaps appear in winter and tighten back up in summer. That’s wood behaving exactly like wood is supposed to behave — not a defect that needs a permanent fix every twelve months.
Diagnose correctly, renail properly, don’t rush the glue work. Your repair will be solid. It won’t be invisible unless you’re a professional finisher, and that’s genuinely fine. Honest repairs on honest trim age better than caulked-over problems every single time.


Stay in the loop
Get the latest craftsman charm updates delivered to your inbox.