Window glazing putty is one of those topics where the advice you find tends to be either too basic or flat-out wrong. I spent last Saturday elbow-deep in glazing compound (my forearms are still complaining about it), and what I learned along the way is worth sharing properly.
This article includes affiliate links. We may earn a commission at no extra cost to you.
Our Top Picks
This section includes affiliate links. We may earn a commission at no extra cost to you.
Sarco Type M Glazing Putty Quart
Professional glazing compound for wood sash
$18.99
Check Price on AmazonReglazing the windows on my 1920s bungalow has been an ongoing project—one of those things that sounds simple until you’re actually doing it. But I’ve learned more about putty in the process than I ever expected to know.
What Window Glazing Putty Actually Does
The putty holds the glass in the window frame. That’s the simple explanation. The more accurate one involves weather sealing, preventing rattling, and keeping water from getting behind the glass where it can rot the wood.
It’s the kind of thing that old-house ownerstend to understand instinctively –on old windows, the putty dries out over decades, cracks, and eventually falls out in chunks. I’ve found pieces of original putty in my window sills that were probably installed during the Coolidge administration. Some held up remarkably well; others turned to powder when I touched them.
Modern windows don’t use putty—they use rubber gaskets or factory-sealed units. But if you’ve got old windows worth preserving, glazing putty is still the right material for the job.
Types of Glazing Putty
Looking back, this should have come first. I’ve tried three different kinds now, and they all have trade-offs.
Linseed oil putty is the traditional stuff. It’s what was probably on your windows originally if your house is pre-war. Takes forever to skin over—sometimes weeks before you can paint it—but it remains workable long enough to get a good bead. The smell is distinctive, kind of pleasant in an old-workshop way.
Acrylic latex glazing compound is easier to work with and cleans up with water. It skins faster, which is good for painting but means you have less working time. I’ve used DAP 33 on a few windows and the results have held up fine over the past two years.
Polyurethane glazing compound stays flexible longer but costs more. Probably overkill for most residential work, though I know some professionals swear by it for commercial applications.
For my bungalow, I’ve been using traditional linseed oil putty. Partly because it matches what was there originally, partly because I like the slower working time when I’m learning.
Getting the Old Putty Out
This is the part nobody warns you about. Removing old glazing putty can take longer than the actual reglazing.
I’ve tried heat guns, infrared paint removers, and brute force with putty knives. The infrared works best on really old, brittle putty—it softens the linseed oil without scorching the wood. Heat guns work but require more care to avoid cracking the glass from thermal shock.
Some putty comes out in satisfying ribbons. Some crumbles. Some clings to the wood like it’s been welded there. You just work through it, window by window.
The glazing points—those little metal triangles that actually hold the glass in place—sometimes come out with the putty, sometimes need to be pried out separately. I keep extras on hand because they bend easily.
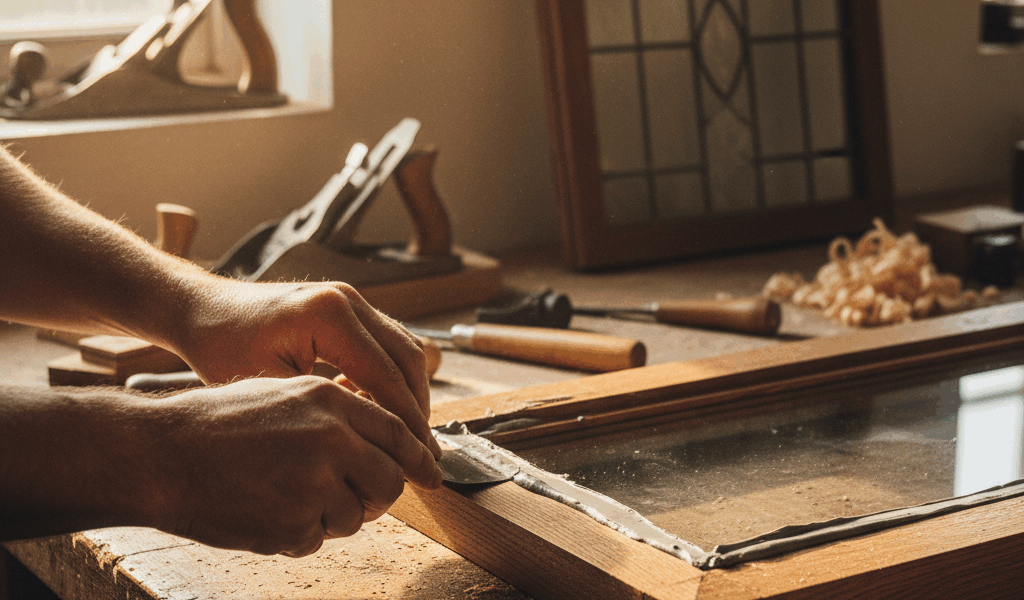
Applying New Putty
The first time I tried this, I made a mess. Putty everywhere except in a neat bead. But there’s a technique that works once you figure it out.
First, I warm the putty by kneading it in my hands. Cold putty straight from the can is stiff and uncooperative. A few minutes of working it makes all the difference.
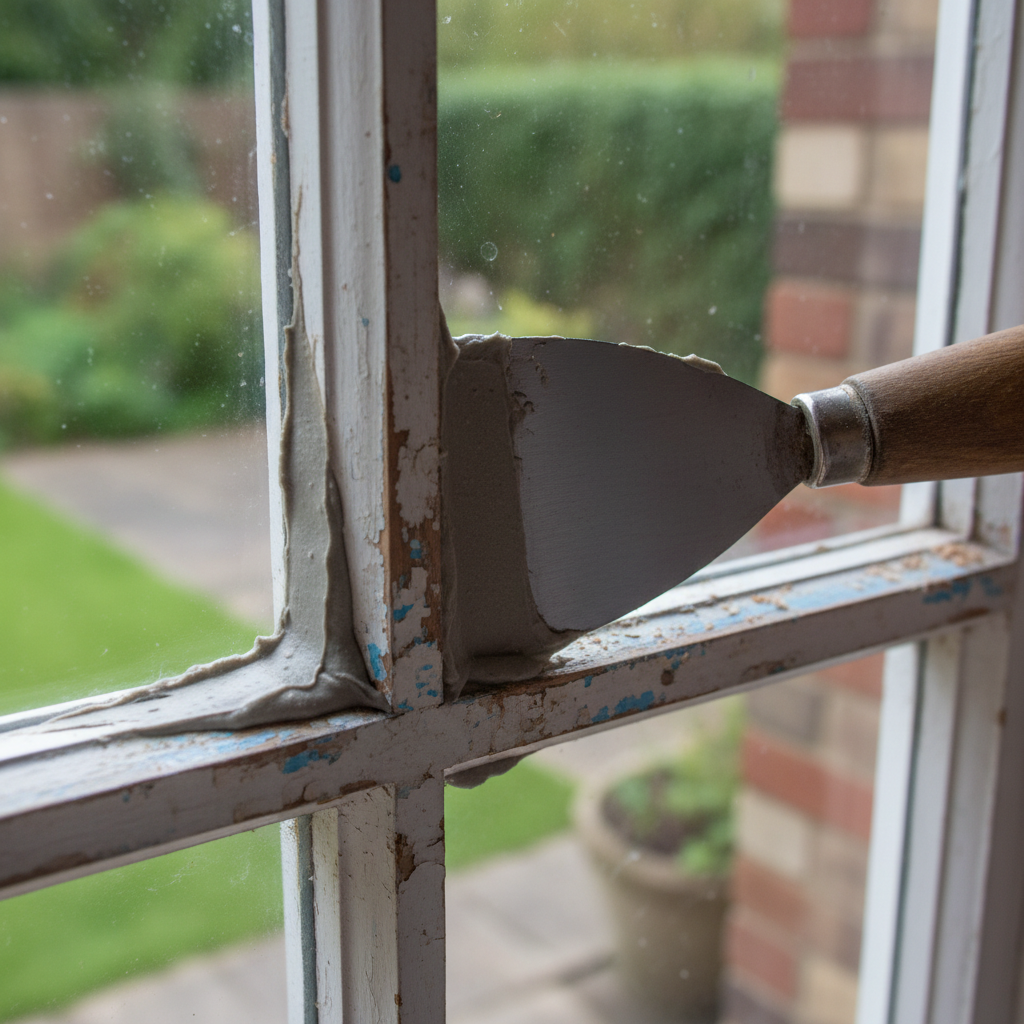
Then I roll it into a rope about pencil-thickness and press it into the channel where the glass meets the wood. This is the “back bedding” that cushions the glass and seals the inside edge.
Glass goes in, glazing points get pushed in every eight inches or so, then the face putty goes on. I press it in firmly, then use a putty knife at an angle to create that classic beveled look. The knife should be slightly wet—I keep a rag with a little linseed oil handy for wiping the blade.
The goal is a clean angle that sheds water away from the joint. It takes practice to get this consistent.
The Waiting Game
Linseed oil putty needs to skin over before painting. The recommendations range from one week to several weeks depending on who you ask. I’ve been waiting two weeks minimum, and even then I test it with a fingertip to make sure it’s not tacky.
Paint too soon and the paint won’t cure properly over the uncured putty. You’ll end up with a sticky mess that never fully hardens. I learned this on my first window and had to scrape everything off and start over.
The paint should lap onto the glass by about 1/16 inch to seal the edge of the putty. That little overlap is what keeps water out of the joint long-term.
Mistakes I’ve Made
Plenty. Using putty that was too cold. Rushing the removal and cracking a pane of original wavy glass. Painting too soon. Making the putty bead too thick so it oozed out the inside of the window.
The wavy glass one hurt the most. That was irreplaceable antique glass, and now there’s a modern pane in that spot. It looks wrong, but it functions.
I’ve gotten better. The windows I did last month look almost professional. Not quite, but close. And they’re sealed properly, which is the point.
Is It Worth It?
For old windows, yes. Proper reglazing extends the life of wooden windows by decades. It’s cheaper than replacement windows and maintains the character of an older house.
It’s also satisfying work once you get the hang of it. Slow, messy, but satisfying. Each finished window is a small victory against entropy.
I’ve got about thirty more to go. At my current pace, maybe another two years. But they’ll outlast me when I’m done.

Stay in the loop
Get the latest craftsman charm updates delivered to your inbox.